Pages

Showing posts with label Quilling. Show all posts

Sunday, November 11, 2012

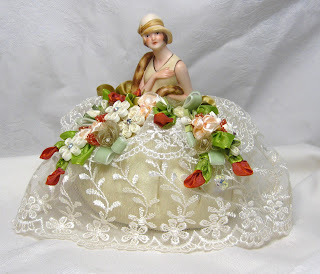
Half Doll Pincushion


Hi all!! Back again with another project, this one that has a little bit of everything in it - quilling, ribbonry, sewing, beading, porcelain doll!  I have had this ready but not photographed because are whole family has been down with what I call the "creeping crud".  One of those bad head colds that zap the life out of you.  I have been counting the days now for a week to look forward to feeling better, but that hasn't happened yet!

Last weekend my DH took me to the International Quilt Show here in Houston and sweetly walked around while I looked at the vendors and the quilt displays, never huffing, never looking at his watch.  He's a keeper!  One of my favorite booths is the Helen Gibbs Ribbonry booth. She had the most beautiful projects for ribbon, stunning flowers that can be made into all sorts of feminine frillery! I think I have almost all of her books and while I have made some of the projects I just love to look at the pictures!!


I have in the past tried my hand a porcelain doll making and have created porcelain dolls from greenware to dressed and have loved the whole process.  The studio that I was taking classes from closed and I never found another to continue, so my supplies were put away for another time.  While at Helen's booth, she had for sale a kits to make vintage porcelain half doll pincushions.  These vintage beauties were all the rage back in the day and women decorated the "skirt" pincushion portion of their bodies with silks, lace, ribbon flowers and beading.  They were used to create tassels, tops to powder puffs and to hide anything on the dresser that was "unmentionable" in polite society.  There are lots of picture on the net of them and I love to look at them for inspiration.

Front view


My mind immediately went to "I can add quilled flowers in the mix and it would be stunning!" After I assembled the bottom pincushion from the dupioni silk and attached the flapper doll half body. Then I added her two layer lace over skirt and started to embellish it with an assortment of ribbon flowers and beading.  The kit came with a few flowers but the majority of these were made just for her.

Right front side
 
I quilled white six petal flowers with aurora crystal centers, buds and leaves to add amongst the ribbon and lace.  The quilled flowers were held in place by the same thread that I used for attaching the ribbon flowers.  I just set them in the design and came up with my threaded needle close to the center of the quilled flower and then down through the adjoining petal.  If you look close with the picture enlarged you will be able to see the thread, but not when viewing it from a normal range.  The buds were glued in as they were a bit tricky to get them to sit the way I wanted them to.  I have used fabric glue before to glue the quilled flowers on the Ring Bearer Pillow with success.
 
Left front side
 
There are many antique half dolls for sale on ebay and other places on the net, but Helen has a source that recreates them for her.  The reproductions come in a wide rage of ladies, dressed in all sorts of historical costumes to ones that are more modern in dress, as well as a wide range of poses, colors. 
 
Back view


I would love to try my hand at porcelain painting again and have found another studio that pours the doll bodies!  Unfortunately the studio is about 45 minutes away and I don't know how often that I will get to go for classes, but, I can get the blanks done and fired to paint and fire the painting with my own kiln.  It takes several firings to get the greenware to a point where you can paint the features and each layer of painting takes another.  This doll body is beautifully done by the artist that created her. This lady has become an heirloom for one of the grand daughters, but since I have two DGD's I will need another and I have a design in my head for another with all quilled embellishments!


My online quilling class Quilling, Twirled Paper! is being offered again by My Creative Classroom.  It is six weeks starting November 26, 2012 with a two week break for the holidays, starting again Jan 7, 2013 with the final two lessons.  The class covers beginning quilling and moves onto intermediate quilling techniques.  There are projects each week to create to show off your quilling skills, a forum to chat with me and your fellow students and a gallery to post your projects if you like!  You can view the lessons at your leisure when ever you like and with the MCC Extended Enrollment you will have access to all the class materials even after the classroom closes.  And, if you enroll for any class in November you will get the "It's Ornamental" class free!  To see the class description, supply list and optional kit, click on the banner above or here.
 
Thanks for visiting and all the sweet encouragement that you leave in the comments.  Feel free to email me if you have any questions!
 
Shalom,
 
Sonya


Tuesday, February 7, 2012

Quilled Blue Malaysian Flower Necklace


Wow, it amazes me how time flies!  The last few months of last year were really busy, taxing and just plain crazy.  And, while I had projects for Custom Quilling (this is one of them), I did not post them.  I want to thank all who follow my blog and apologize for not attending to posting and I DO appreciate you stopping by to visit my projects!!!!  Sometimes it is hard to "get back into it" as they say after an absence. 

So I will catch up on the projects not posted and then start with fresh ones for this year!  I have been lurking around the web and have seen some amazing quilled projects from all over the world.  Quilling is really coming into it's own with some unique styles from this new generation of quillers!


While browsing some those world wide quilling sites I found this little flower that is called a Malaysian Flower.  So called for the Malaysian quillers who created it and use it in some beautiful projects!!!!  Here is a link to the flower tutorial (scroll down to find it).  I decided to use it in a necklace and this time not gild the edges with metallic paint.  I loved the blue and white color pearly papers and I think it makes a striking statement. Click on pictures to see larger view. 

I wish I could capture the sparklyness (I know that isn't a word lol!!) of the crystals and dangles.  Even the flowers shimmer from the pearly papers.  These flowers are easy and fun to make and I know I will be using them often as they are lovely in any color combination.


My first online quilling class for My Creative Classroom was such great fun!  I loved the students and am looking forward to seeing their quilled projects for years to come!!!  I will be adding new quilling project classes in the coming months, but for now my original class, 
Quilling, Twirled Paper!
is being offered again and is open for enrollment now here.  Classes start March 2, 2012 but you can start after the official first day of class.  You can see a description of the class, a supply list and kits on the link above. I am looking forward to the new class and hope to see some of you there!  If you have any questions please email me!


More posts to post in the coming days, so check back soon! Thanks for all the comments that everyone left for me in my absence!!

Shalom,
Sonya

Wednesday, October 5, 2011

Falling Leaves Quilled Necklace


Hi everyone!  I have neglected my poor little blog and will be posting about the same amount for a couple of more weeks. I am working on the classes for my online quilling class for My Creative Classroom and there are two more weeks to go. So after that I should be back to posting regularly : ) !  

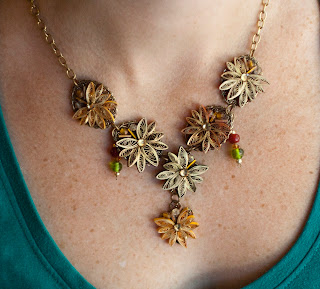
I do have a post for today though and at the first of each month I have projects that I have created for the Custom Quilling Newsletter.  The kit for October had beautiful fall colors in it and I couldn't resist making another jewelry piece.  I used oval filigree jewelry pieces as my base for the quilled leaves.  Each quilled gold gilded leaf gives a flash of fall color when seen from the side. 


The leaves are "falling" down the necklace to the last one that dangles.  Fall color beads dangle amongst the leaves while beads and crystals give it sparkle. I am very ready for fall and we are just now getting some milder temperatures here in Texas, although not any rain!  This is my first online class and I have been enjoying it and the students so much, and they are doing so well!!!  Some of the students have quilling experience and others are just trying it out for the first time. They are very creative and their projects are wonderful!

I still have two projects from the newsletter that I have ready to post and I will get them up later.  Thanks to all who visit and leave such nice encouraging notes!   See y'all later!

Shalom,

Sonya

Thursday, August 18, 2011

Quilled Decorative Bottle

Hi all, I have another project to share using the new technique, curled loops (tutorial here).  I love pretty glass and when I saw this red one I new that I had to make a project with it. I used the decorative paper and strips from the August Custom Quilling kit to make the embellishments.  Simple 6 petal flowers are accented with curled looped flowers upon the bottle "label" that wraps around the middle of the bottle.


This time I didn't encircle the loops and curled them for a fan like shape.  I really like this technique it has soo many possibilities. I added a bit of the same to the neck of the bottle along with a tassel.


Try this new technique and post your picture links in the comments!  I have put a link to my online quilling class with My Creative Classroom, Quilling, Twirled Paper! on the sidebar.  Registration is now open and the class starts September 15, 2011.  You can register after the class opens and you have access to the class lessons, gallery until December to finish up.  If you have any questions about the class or projects, just email me at appelquillinggarden@yahoo.com .  Another project tomorrow.

Shalom,
Sonya

Tuesday, August 16, 2011

Quilled Letter Holder

Hi all, I have neglected my poor little blog but have been working hard behind the scenes getting my online quilling class for My Creative Classroom ready for registration. It is now finished and I am excited that I can now reveal the link to the class.  But first the project above that I made for the Custom Quilling Newsletter this month.  I used a purchased letter holder and added the quilled embellishments.  The technique that I used for the center flower was from this blog and it uses looped flowers in a new and very pretty way.  Asma has a great tutorial on how to create them plus many wonderful projects using them! Stop by and visit her blog you will love her projects. I know I will be using this technique again.


Now for the quilling class, it is named Quilling, Twirled Paper! It will cover the basics, intermediate and some advanced quilling techniques and will be 6 weeks long.  There will be a class project(s) each week with week's 5 is a quilled keepsake such as I feature here on my blog.  Week 6's project is a quilled necklace that used the technique that combines jewelry pieces and quilling such as this one.  You can visit My Creative Classroom Quilling, Twirled Paper! class site here to see the full description, cost, and supply list (which Denise at Custom Quilling has a copy of and can help in ordering any supplies, Thanks Denise!).  If you have any questions about the class, just email me at appelquillinggarden@yahoo.com and I will be glad to answer. There are also many other wonderful papercrafting classes offered this fall through MCC.

I should be back to creating on a regular basis now that the class is up for registration.  I will be back tomorrow with more projects!  Thanks for all the comments, I have and do read them all.

Shalom,
Sonya

Sunday, July 24, 2011

Quilled Butterfly Necklace


Here is another of the project for the Custom Quilling Newsletter this month, a quilled butterfly necklace.  I used a butterfly filigree piece for the base and used pink strips to quill teardrop shapes to follow the pattern on the base piece.  I then gilded them with a silver pen.  


The butterfly's body was made from beads and silver wire which also made their antennae. AB and pink crystals give it some sparkle as well as the butterfly dangles.  Click on the pictures to enlarge. I love making quilled jewelry with these filigree base pieces and the possibilities the extra foundation that it gives to the piece.  Short post for today, thanks for all the encouragement!!  Back later with another project.

Shalom,
Sonya

Thursday, July 21, 2011

Back Again!


Hi everyone, sorry for the long MIA.  I have not been blogging, but I have been working on a project that has been taking a lot of my attention and that I am excited about.  I'll tell you about that in a just a minute.  First I want to share a project for this month's Custom Quilling Newsletter, an altered ribbon spool with a quilled fan.   I have seen several of these altered spools and have been collecting them to try my hand at one. 


I used the shades of pink strips and card stock that came in the kit to create the fan and floral punch flowers.  I used a quilling grid with circles and angle lines to lay out the spirals that make up the spokes of the fan, pinning them in place.  I then made the looped portions at the top of the fan, again pinning to hold them in place while drying and keeping the fan shape steady.  The two wing butterflies in the middle give the fan more stability as well as the teardrops between the spokes where they meet. A gold tassel hangs from the bottom of the fan.


It is a delicate design and if I do one again I will have to make adjustments to the double spiral spokes.  You can see that a couple of the spirals are separating.  I think I needed to glue the ends together so that they stay spiraled next too each other and do not separate.  But, that is for next time.  Three teardrops and a flower help stabilize the point where the spokes meet even more.  At this point I could un-pin the fan and it held it's shape well.  A few more tear drops at the tips of the spokes and some bling and it was finished. 

The spool was covered in decorative paper around the center and has scallop circles out of the same paper on the ends.  To cover the bottom end I die cut the center of a scallop circle with a circle die the diameter of the center, cut between two scallops and hid the seam with embellishments. I wound the wide pink ribbon from the kit around the spool and added pearls, buttons and lace at the ends.

Next came the more quilled flowers and butterflies mixed in with the pink lilies.  Aurora crystals, more buttons and pearls make it frilly and feminine. 

Now for the news that I have been waiting to tell you about.  This fall I will be teaching a 6 week quilling class with -


 I had taken two Tombow marker background classes through MCC and loved the format, the classes and the teacher, Kim Teasdale! The class was online and while I was considering taking a class, I wondered if it was going to be worth my time and cost.  It was and I was not disappointed!  There was a lot of content, easy to follow and understand and you feel as if the teacher is right there giving you private lessons even though it is a PowerPoint presentation with added videos.  Kim, as well as all the instructors, were also there to answer questions and give feedback on our projects that were posted to the class gallery.

There are many like me who would like to take a class but have no teacher close by or giving a class when you would like to or able to take one.  I wish there had been a class like this when I first started quilling. One where the basics of quilling, using the tools, through the varied techniques of husking, looping, 3D etc. were taught and demonstrated.   The online format with MCC gives you that opportunity and the freedom to sign in on your schedule and view the weekly lessons when the class semester is open.  And you have the added time of two weeks after the last posted class to go back and review any lesson, post your projects, get questions answered, and download the class PDF lessons.

The class that I will be teaching is 6 weeks and covers quilling basics, using the tools, shaping coils, fringing, domes, bells, folded roses, looping, husking, 3D quilling.  Each week there will be a guided project to showcase your new quilling skills. The last two weeks you will be completing a Keepsake quilled project and I will teach you the quilled jewelry technique that I used to make the necklaces and bracelet posted here, here, and here.  All with class lesson PDF's.

The class will be open for enrollment on August 23rd 2011 and I will have more info later. Until then, if you would like to get a preview of the projects and explore the other classes at My Creative Classroom click here. and see if the classes are a match for you. And anytime you would like to go to MCC to see what great classes are offered, from my blog, just click the MCC blinkie on the right sidebar.  If you have any questions please email me at appelquillinggarden@yahoo.com.

Tomorrow I will post another quilled jewelry project.  Thanks for all the sweet comments while I was MIA.

Shalom,

Sonya
Your comments are read and appreciated!

Tuesday, March 1, 2011

Quilled Spring Mini Album

Hi all, back with the first of this month's Custom Quilled March newsletter projects, a mini album with quilled accents. 
 A while back I had purchased several chipboard albums with a ring at Michael's and stashed them away for a later time.  One Youtube video caught my eye and I started looking at more of them and their creators blogs.  I fell in love with these little album's with their many surprises, pockets and pullouts.  I love the shabby chic ones, the steampunk ones, the ornate ones that have something new to find every time you open it. 

 One of those video tutorials here, shows how to paint the chipboard that has edges too detailed for covering with paper.  Also it shows the binding technique that will expand with the embellishments and future addition of pictures/keepsakes etc.  I painted the pages a light green and bound each page with a binding piece, card stock piece and then DP and then started to make the pockets and tags. 

 Again I went to Youtube to find all the pocket ideas and tutorials.  Some I changed other I used as they were.  Most pockets in my album have many more places to tuck more tags or pictures into. 
 The tags are a combination of manila shipping tags and ones that I cut out with my Criuct and Picturesque cartridge.  All of the tags have simple 5 petal quilled flowers and leaves as embellishments that were made from the shades of spring strips in the March kit.  All the flowers have rhinestone centers for sparkle.  Edges of the tags were inked and some have gold gel pen stitching.
The front of the album has a frame for either journaling or a special picture. It was fun to make and I will be making more of these.  There are so many ways to create pockets, foldouts and tags and even the shape of the albums are endless.  With the expandable binding it allows for the dimension of quilling and all of it's versatility.  If you make one, link a picture in the comments section below to share!

Also don't forget to stop by Custom Quilling to see the super cute projects that Sue has also made for the newsletter! Back tomorrow with another of the projects!

Shalom,
Sonya
Y'all are so sweet to leave me such encouraging comments, THANKS for all of them!

Sunday, February 27, 2011

Quilled in Blue Bracelet


Hi all, back with another quilled jewelry project.  This bracelet was on of the projects made for the February Custom Quilling Newsletter that I haven't posted yet.  I used the navy strips that came in the kit to quill the motifs.  These strips are a little heavier weight and I think it gives the quilling more stability for jewelry. 


I used oval shaped antique gold filigree pieces as the bases for the quilling.  The motifs have alternating rounded and softly pointed petals with light and medium blue crystal centers.  Bugle beads and peacock beads accent the bracelet ovals for additional sparkle. 


The motifs were gilded after completion and before adhering to the filigree bases with an 18KT gold pen.  I love the way the filigree bases expands the possibilities of quilled jewelry and have more ideas and shapes to play with!  Back later with another project!

Shalom,
Sonya
Thanks for the lovely comments!!

Tuesday, February 8, 2011

Quilled Arbor Perpetual Calendar


Hi all, back with another of the Custom Quilling DT projects.  This is a different perpetual calendar than the previous one that I did.  I saw several of these handy little block style calendar made from wooden blocks or paper and decided to give one a try.  The basic design of these calendars is blocks and bars that have numbers and months that can be mixed and matched for the correct date.

There are many square box templates and tutorials on the Internet and you could also use your Cricut to cut them if you have one.  Here is a good tutorial, with cute examples, that shows how to cut and assemble one of these calendars from card stock.  The month blocks are smaller and the base design is different but you can alter the design as you like.  If you alter the month blocks to be larger be sure to add to the end flaps as well so they will close properly.   

For the calendar assembly I inked and stamped the edges of the number and month blocks before I put the them together.  The numbers were cut from my Storybook Cricut Cartridge.  I printed the months out on my printer and then used punched the ends with a MS punch, cutting off excess to fit the block front. In the tutorial  the three month blocks sit on top of the calendar base and the number blocks fit perfectly on top of them.  Since I wanted to print my month names I made mine a bit bigger and only two fit on top of the base, the third is stored in the base.
The calendar base is constructed from an open rectangular box and a back piece that forms the arbor.  For the arbor back I started with a rectangular piece and used on of my circle Nestabilities that made a nice rounded shape on the top and ran it through my Cuttlebug only half way so it would leave a rounded top.  next I took the next smaller Nestie circle and laid it on the rounded top and did the same half way cut and then used my craft knife to cut the straight edge at the bottom of the half circle to finish the arbor arch.  The white lattice is a MS punch. 

For the quilling I used the pretty shades of blue and green quilling strips in the CQ Feb kit and quilled the flowers and vines adorning the arbor.  The grass on the front is made from hand fringing two strips of green card stock and layering them.  It isn't a straight fringe but one of tall spiky grass like shapes.  A blue bow and some Stickles to the centers of the quilled flowers finish off the design.  It is an easy design and can be altered in so many creative ways for a calendar that you will get many years worth of use from, or give as a gift.  Back tomorrow with another project a quilled bracelet.  Until then,

Shalom,
Sonya
Comments and project links are always read and appreciated!

Friday, January 7, 2011

Quilled Heart Necklace


Hi all, back with another of the projects for the Custom Quilling Newsletter, a Quilled Heart Necklace.  I have loved making quilled jewelry since I found that I could combine the brass/silver stamped filigree jewelry components with it.  I used several shades of the pinks and reds quilling strips to create the heart.  It started out a little smaller but "grew" with the shapes added.  Click on any picture to enlarge.

The jewelry components that were used for the base of the heart were two angel wings glued together to form a heart shape.  I traced a heart shape and then used curved teardrops shapes to frame the heart shape.  Then I filled in the design with two smaller hearts and s scrolls.  After it was dry I used my 18KT gold pen to gild the edges of the shapes. 

Two filigree side pieces, red crystals and beads drops and chain drape were added to finish.  I have so many more designs in work and will be offering these in my Etsy shop that will be opening this month, promise!


If you try your had at making quilled jewelry, leave a link in the comment section below to share, I and others who visit would love to see it!  Working on some card projects to post soon.  I have rearranged my craft room again, trying to get it better organized and user friendly.  I have acquired a lot of rubber stamps that have never been inked and so I am going to try my best to make projects with them!  I will also be working on the video tutorials that have been requested also.  I am not a techie and it takes a lot of trial, error and figuring out how to do it for me, so it unfortunately takes me longer.  Have a good day and thanks for taking the time to visit me and leaving comments!!

Shalom,
Sonya

Sunday, January 2, 2011

Floral Punch Rose and Quilled Hearts Cake Box

Hi, all!  Wishing everyone a blessed and great new year!  I have another project to show you, one that was made for the January Custom Quilling Newsletter, a Rose Cake Box.  This is one of those projects that I have had on my "want to do list" for a bit.  I used two paper mache boxes and painted them a light pink.  Then I sprayed them with Glimmer Mist Bubble Gum for a pearly shimmer to the "icing". As usual that isn't showing up well in the photos.  Next I added the border "icing" from a pre-pleated ribbon that looks like real cake border icing.  For the top icing of the "cake" I used a light pink satin ribbon that has tone on tone circles.  Click on any picture to enlarge.


The "cake" decorations are floral punch roses and punched accent flowers with textured pearl centers.  I used the pinks and pearl papers in the January Custom Quilling kit to make these.  To make the roses I used the medium pear punch and punched about twenty or so per flower.  Then I inked the edges of each pear and snipped a bit from the stem edge.  The pears were then shaped and mounted onto a green 6 pointed snowflake base.   

I used about 1/3 of a styrofoam ball covered in pink tissue paper under the roses on top to give the cake embellishments some height.  The rose leaves were inked and added along with the punched icing and pearl  flowers.  Quilled hearts, made from the strips in the kit, were added and were made from two teardrop shapes glued together with a crimped darker strip around it.  Bits of the pre-pleated ribbon were added in among the roses like real icing would be.  A multi loop bow was added at the back of the flowers on top and has accent flowers and a quilled heart nestled among it.


The roses, buds, flowers and quilled hearts cascade down the front and as an accent on the back.  The top box is glued to the top of the bottom box so you can use each box for trinkets or gift giving.


I used these same punched flowers and quilled hearts to embellish the paper mache frame that came in the kit also.  The only change from the cake is that I sprayed the frame with Glimmer Mist Red Apple instead.


Both were fun projects and I have one more to show you, another quilled jewelry piece that I will post this week.  It has been hectic this last month with graduation, the holidays, visiting with family.  My brother is down from Pittsburgh and we have been seeing the sights of Houston with him.  The last time he has been down was about 20 years ago, he is loving the "warm" weather here in Houston!  Thanks to all who have and do take the time to visit my blog and comment.  It keeps me motivated and is so very encouraging to continue when I am stumped for creativity or down with pain. 

Shalom,
Sonya

Friday, December 17, 2010

Embellish Me with Quilling Blog Hop


Hi all, back again with the 2nd hop for today! Two hop posts for your inspiration and chance to win!

1st hop - LIME LIGHT CHARITABLE DESIGN TEAM happening now, see post below this post!
2nd hop - EMBELLISH ME WITH QUILLINGstarts NOW.

Let's get started with our 2nd hop - the EMBELLISH ME WITH QUILLING BLOG HOP.  If you came here from  Emma's blog then you are in the right place.  If you would like to start from the beginning click here.  The hop runs from 11:00 pm CST Friday to Sunday the 19th.  To enter for a chance to win the HOP CANDY click on the beginning hop link here for instructions. 

Here is my Embellish Me with Quilling project, a Golden Floral Quilled Jewelry Set.  I had decided to do another jewelry set for the hop before I knew what the blog hop name was and it worked out that it fits perfectly.  It is a quilled 'embellishment' that you can wear!


After doing the first quilled set here, I knew that I would be doing more.  This one uses antique gold bases this time and off white and beige gold edged strips in an off-center design.  The metal bases were jump ringed together and the quilled motifs were glued onto them.  I added topaz crystals, czech crystals and tube beads for accents and for, of course my favorite, sparkle! It really catches the light.


The earrings were made with the same method as the first set and are accented with the same crystals and beads.  My oldest daughter is the model for this set, I wonder if I will get it back from her? I love the vintage feel and you will be seeing more of these sets as my mind is abuzz with all sorts of colors and variations. 


Have fun on the hop and here is your next stop on the hop: Jessicawww.kinderstampo.com where I am sure you will see an amazing project that she has made for your inspiration.

Here is a list of the hop sites if you lose your way or want to revisit any site:

Linda- http://krazyquilling.com/


Jennifer- http://creativequilledcreations.blogspot.com/


Leesandra- http://sweetspotcards.blogspot.com/


Sonya- http://appelquilling.blogspot.com/ That's me, your HERE


Debbie- http://craftydeb-ddscrafts.blogspot.com/


If you have never tried quilling before I hope you will be inspired and encouraged to give it a try. Pre-cut packaged strips are easy but you can cut your own 1/8" strips from any text weight paper. Start with the slotted tool to get the feel of coiling the strips.  Keep practicing until you get even pressure, this is the key for an even consistent coil. Any good craft glue is ok to glue the end of the strip to the side of the coil. Tearing the end of the strip before you coil it will give you a better finish and a will hide the end joining of the coil better.  Experiment with looser coils and tighter coils until you find the look you like better, it is your choice.

Experiment with pinching the shapes and combining them into motifs.  The needle tool will give you a smaller center but can be a little trickier to use.  The needle is held stationary and the strips are "rolled" around the needle with your fingers instead of being "locked" into the center like it is on the slotted tool (the slotted tool is twirled in your fingers to make the coil).  Think of the needle tool as the thread spindle on a sewing machine that allows the thread spool to turn freely.  The same motion that you would use to rewind a spool of thread on this "spindle" is the same motion that the quilling strip makes on the needle tool.  The Yahoo quilling group helped me with that info as I couldn't get the hang of the needle tool until I understood that it wasn't supposed to "lock" onto the needle.  It is a great resource for quilling tips, encouragement and help.  There are lots of online sites that show how to make the shapes and to get inspiration from.  Give it a try!

For all of my quilling blog friends who are already hooked onto quilling and visit me often (and new friends), I hope you have a great time and get lots of inspiration from the projects!

If you missed the first hop of my double-header blog hop posts today, just look at the post below this one for the Lime Light Charitable Design Team Blog Hop that is still happening, with awesome inspiration and over $150 in great prizes!  Have fun hopping and good luck!

Shalom,
Sonya
Thanks for all your encouraging messages and for visiting me!!!