Pages

Friday, July 30, 2010

Pretty Please with a Cherry Blossom on Top


Hi all, today is the FSS July Blog Hop to show you the great new releases!  I have two cards for today!  Here are the details of the Blog Hop and how to win some Fred She Said goodies:

How about some mid-summer fun with a Blog Hop?!

The Fred She Said Design Team girls have been busy creating and have some lovely eye candy for you ! Please leave them some love on their blogs.

At each stop on your way, there will be a special word... collect them up and there will be instructions at the end of your journey on how to enter.
The winning entry will receive $20 GC for the Fred She Said Store AND.... (AND!) ... a $20 USD Gift Certificate for CropStop so you can get that punch, or dies, inks, or embellishments you have been having you eye on :)

We will receive entries until Thursday August 5th Midnight EDT.

Here is my projects for your inspiration.  The first card features the new Cup Cake image and I must thank Tracey for creating it for me and you!  There is one cup cake image with a daisy on top and you can see it here, it is SOOO pretty!  Also there is a plain version that you can put any Fred She said flower or whatever you like on, as I did on my card, using the red Cherry Blossoms. I also paper pieced the cupcake wrapper and added glitter sparkles on the top and the cherry blossom centers.

You can see the inside is decorated also with the birthday sentiment that I printed off of my computer that says, "Will you tell me your REAL age, pretty please with a cherry blossom on top?"  So cute and versatile for many occasions as you can put anything on top your cupcake.  You will be seeing more of this cutie.


Next is another card using the Burdy image.  I just used the girl bird from the "Love is complicated" image to make this contrats on the news of an expectant baby. 


I printed the bird with the nest thought on watercolor paper and watercolored it with Tombows.  Then the image was glittered and Crystal Effects were added and was popped up. The scallop layers and the branch were cut from the Storybook Cricut cartridge and the lacy border is a Martha Stewart punch.

The inside has the sentiment, again printed off my computer that says, "A little burdy told me" and "Congratulations on your new nest".  This is one that you could color in your favorite drawing/paint program or even paper piece for a whimsical look which I will give a try next.

Two cards with a different look for your inspiration.  There is more in store for you along the way.  My special word is: "crafty" . Collect all the words along the way and enter at the FSS Challenge Blog, the last stop, and here is your next hop stop:


Have fun and here is the order of Blog Hop participants in case you lose your way.


Sonya - That's Me,your here!

Shelly http://www.jaspere-jaspereslittlecorner.blogspot.com/

Tracey http://www.fss-challenge.blogspot.com/  ( end of your journey and blog hop entry instructions)

Good Luck and if you want to go shopping for some Fred She Said digi images, click HERE!!!  Until tomorrow,

Shalom,
Sonya
Have fun on the hop!!! Please vote on the poll on the sidebar to pick what you would like as a tutorial!

Monday, July 26, 2010

Peach Peony

Hi all!! Sorting through mounds of crafting leftovers, again, trying to find space on my main crafting table!!!  I can't seem to create without making a mess!  There is a place for everything and the things that I use most are in arms length to put away, but things never seem to get to where they call home.  So I am left with bits and pieces of paper, card stock, paper pads out and all over, embellishments adorning places that I didn't intend, on and on.  I see other's crafting spaces and they are so neat and organized, no mine, utter chaos!  So I have to spend a day or two putting things away so I can have space to set something down without losing it on my table.  Good thing I have some cards in the line up and photographed all ready to post or I wouldn't be able to find them, lol! 

Here is one for today a new digi image from Fred She Said a beautiful pre-colored peach peony in a jar.  I love these pre-colored images, so easy and sooo pretty!! I also love my new Cricut Expression and all the wonderful shapes, frames and just about whatever you want!  I put it off for so long and now I find myself wondering why. 

 I printed the peony image twice onto Matt Photo Paper which gives the image amazing color.  Then I cut it out with my Nesties and used a Cricut frame behind that.  The peony flower and the vase are cut out and popped up for dimension.  The flower was sprayed with gold Glimmer mist and the vase was covered in Crystal Effects for a real glass look which I hope you can see in the picture above. Instead of a bow I used my Cricut to cut the flourishes  to wrap around the vase.  All the gold highlights are made with a Gelly Roll gold metallic gel pen, my new favorite! The card base is a peach metallic card stock and the base layer is a sparkly designer paper. 

The inside is decorated also with another of the peony flowers, flourishes and framed panel for writing.  Tracey makes it so easy to create beautiful cards with her digi images, you can find them here. She has some more new releases which I will post cards with in the coming days. 

I also posted another poll on the sidebar of my blog.  Please take a moment and click on what you would like to see in a tutorial.  The 6th poll question is not really an option but instructions to click on the "Comment" link on the bottom of the poll to leave your requests for a tutorial that is not listed on the poll.  I am not sure but it may not show up until you hit the "Submit your answers" on the bottom first.  But you can always leave a comment on any post with your questions or suggestions.  Thanks for your visit and help!

Shalom,
Sonya

Sunday, July 25, 2010

Blue Rocking Horse

Hi all, Hope your summer is full of fun and stress reducing vacations! My dh started a new part-time job that makes just picking up and roaming with our travel trailer a little more difficult to do.  We miss that "freedom" to do that now and won't get to go that often anymore.  : ( .  But my daughter and family moved about 1/2 block from us so now the grand-kids are at our front door most every day now to swim in the pool or to get an ice cream cup "to cool off"!  But, back to the card for today.  This is one that I made for my brand new great-nephew!  Wow, makes me sound old!  That's ok, my aunt Sandy and aunt Bonnie are great-great-aunts!!

I made it with my new Cricut Expression and the A Child's Year cartridge.  At first I didn't think that I would use this cartridge enough to purchase it, but after looking through it I saw some really great possibilities for projects.  I am still "getting-to-know" how to use the CE and what speed, pressure and depth for the blade to cut and which goes with what paper so it makes clean cuts.  And this card is one of those try-outs.  I love the rocking horse and my niece-in-law said the new baby was going to be a cowboy, so this is perfect! 


I cut the rocking horse and it's shadow out and added silver gel pen highlights as well as to the other cuts.  Extra fine holo glitter give the cuts some sparkle.  The edges of the white pieces are inked in a coordination blue.  The front base panels are cut to mimic a quilt pattern and have machine stitching around them as well as the inside panel. You can see the dimension of the layers in the picture below. I love popping up the images.  But mailing them was causing some concern that they would get crushed by the postal service!! So I made a test box envelope and will be mailing it out to some family members to see if the cards make it there in one piece and not crushed.  If they do, then I will post the pattern, it is really easy, for everyone to use!  If not, back to the drawing board!


I have been experimenting with combining my quilling with the die cuts and will be sharing those as I finish them, there is even a project finished that has quilling and fabric together.  It will post at the first of the month. The internet is a great place for inspiration and there are so many great blogs and forums nowadays that you can get "lost" exploring them.  My bookmark of favorites is soooo long that I have to ration my time checking them out each day or I would have no time for anything else! 

I love to look at what others are creating and seeing the new and fresh ideas and re-worked old favorites but I often don't have the time to leave a comment, especially if it is a blog where most of the projects I love and would want to leave a message saying so.   I do read all the comments and love hearing from you!  I wish we could all meet and play with paper and glue for a while and get to know each other!  But with the distance this is the next best thing! I just wanted to thank everyone that comes by and visits for a few minutes whether you leave a comment or not, I know the time it takes and hope I the projects that I post will inspire your creativity. 

I love doing all kinds of paper craft and am working on a regular weekly "schedule" of cards, quilling, stamping etc.  Hopefully I will be able to stick to it.  If you want to see something, a technique, design, etc.  just let me know.  Still working on what tutorial projects to do, is there a specific one(s) that you would like to see??  Again, let me know and I'll do my best to show you!  Thanks for making it till the end of this long post! Until then,

Shalom,
Sonya

Thursday, July 22, 2010

How've You Bean


Hi all, hope you are having a great summer!  Have another card for you today.  I have been wanting a tea/coffee stamp for some time and when the stamp sale was going on at my LCS I finally got one!  This is one of the cards that will go in my Etsy shop as soon as I can work out the shipping details on the store.  The coffee/tea cup was stamped onto water color paper and embossed with clear embossing powder, then water colored with my Tombow markers. 

Then I inked the edges with Distress Inks, Antique Linen and a bit of a sage green ink also.  The steam is accented with some clear glitter and the coffee in the cup has Crystal Effects for some shiny liquid look. I love the way the blue pops off the card!  I cut them out with my oval Nesties and added some brads.

The matt layers on the base of the card are from K & Co. and I used two coordinating glittery and foil card stock/paper in a opposing triangle pattern.  I used my new Cricut Expression to cut the flourishes out in brown with a black shadow.  They are accented with a gold gel pen. A brown bow finished the front.

For the inside I stamped the row of coffee beans onto water color paper and again embossed them in clear embossing powder and water colored them with my Tombows.  They are layered and matted with the same papers as the front.


The sentiment "how've you bean" was also from this cute stamp set and was embellished with two of the coffee beans.  A writing space is made from oval Nesties atop the triangular matts, the edges inked with Distress Tea Dye for that "coffee" look.


It was a fun card to do and I love the colors! Tomorrow I will have a "shape" card to share with you and be sure to check back as I still have a stash of cards ready to post!

Shalom,
Sonya
Thanks to all who stop by and visit my little blog, I hope you enjoy!!! Leave me a comment or contact me a the link on the sidebar if you have any questions!

Wednesday, July 21, 2010

Quilled Black and Yellow Soap Box


Hi all! Quick post to show the last of the DT project for July's Custom Quilling Newsletter.  I used another one of my decorative soap boxes which I was wondering how I going to embellish and saw the shades of yellow in the kit were a perfect match!  Someone must have been a quiller when they designed the pattern on the box.  Any writing on the box was covered with die cut panels as bases for the quilling. I copied the motifs in quilled shapes adding the swirls and flourishes on top along with three tone fringed flowers.  The butterfly was cut out of the designer paper in the kit.

A view from the front shows the flourish on the top and the side embellishment.

The inside is decorated also.

Close-up of the quilling on top.

I love the kits from Custom Quilling and look forward to seeing what they inspire me to create! Hope you are having a great summer!  Still have more cards and projects finished and waiting to post so check back!

Shalom ,
Sonya
Thanks for the comments, post a link to your projects in the comments below, I'd love to see them!

Wednesday, July 14, 2010

Waterlily Easel Card

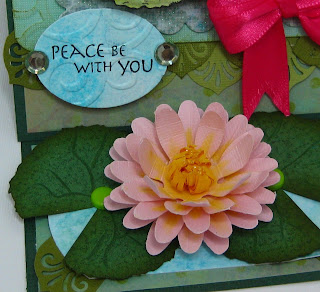
Hi all, I have a card to post that I entered a contest with at Cuttlebug Challenge, and WON!!!! Thank you!! The challenge was to make an easel card and use a Cuttlebug embossing folder on it.  The image is Flourishes Waterlily and has some beautiful images that I had yet to ink up.  The water lily, lily pads and fish are stamped onto watercolor paper in black Stazon and then embossed with clear embossing powder.

I then water colored them with my Tombow markers and a waterbrush.  The water the fish are swimming in is also watercolor paper sprayed with a blue and gold glimmer mist and Tombow markers.  It has a really pretty shimmer to it.  I cut the fish out and adhered them to the water.  I wanted it to look like they were swimming under the water so I cut a piece of acetate the same size oval as my water and popped it up a bit with foam tape.  Then I cut out all of my lily pads out and layered them around the edge of the "pond", popping some up with foam tape for dimension. 

Then I cut out the water lily and blossom and attached it to the lily pads. The large lily at the base of the card was made with large punched sunflowers shaped, chalked and layered in a water lily look.  The center is a 3/4" quilling strip that I fringed and instead of pulling out the fringes, I pushed gently down on the center of the fringed coil to make it bow out on the sides.  I added some glitter for shine. The lily pads next to it are punched from a large circle punch with the edges cut off with paper shaper scissors.  I then cut a wedge shape out of one side and added a green brad at the center.  It is sitting on more "water" paper.

Swirl Cuttlebug embossing folder was used on the back layer, glitter card stock layer and MS punched borders.  A bright pink bow and CB embossed sentiment finish of this card.  I love this flower and will have to make more of them in different sizes!  Thanks again to the Cuttlebug Challenge site for picking my card!!!

I still have more projects finished and waiting to be posted, so check back to see!

Shalom,
Sonya
Y'all sure do leave some sweet comments, Thanks!

Sunday, July 11, 2010

Strawberry Friends

Hi all, back with another project!  This one was made with my new toy!!!!  I finally broke down and got a Cricut Expression!!  I have been putting it off and when I got a REALLY good deal on one and saw the new software Design Studio and such that allow you to manipulate the images to cut in a variety of ways, well, I got it!!!  I have been playing with it and watching video tutorials on the ins and outs of how it works.  So, here is a card that I made with the Wild Card cartridge and Fred She Said's luscious digi pre-colored Emma and Strawberries. 

It is the Doily Card and is cut from the blackout option and then the actual card was cut from DP for the layers inside and out.  There are scalloped Nesties in black, metallic red and white embossed with the Bubble Cuttlebug folder.  You can't see it well because they are mostly covered up, but there are gold dots and inking on the scalloped layers.

These vibrant pre-colored digi strawberries were printed out on matt photo paper several times and cut out and layered at different levels for dimension.  I then highlighted the strawberries seeds with Crystal Effects and dusted lightly with extra fine holo glitter. I added the Just Rite Friends stamp in red ink embossed with clear embossing powered. A Cricut cut butterfly sits atop a red bow.  The inside is decorated with another set of strawberries that have their seeds glittered in a light gold.  I am having fun playing with my Cricut and you will see more of it in my cards and projects!  If you want the Emma and Strawberries design click here and you can see all of the wonderful pre-colored images!

Also, I have been playing with my Everyday Paper Doll cartridge and made my nursing student daughter a paper doll of herself.  She attends Stephen F. Austin University and their colors are purple and white, so her scrubs are purple.  I put a magnet on the back so she could put it on the fridge.

Back tomorrow with more cards!! Until then,

Shalom,
Sonya, thanks for the wonderfully encouraging comments!!

Thursday, July 8, 2010

Quilled Fuschia Gazebo

Hi all, back with another project that I made for the Custom Quilling July Newsletter.  The rich shades of purple quilling strips in this months kit made me think of fuchsias. I love flowers and these little beauty's are one of my favorites! I found this cute wrought iron gazebo candle holder at my LCS and even better it was on sale for 1/2 off!!  I though it would be perfect to drape the fuchsia's on.  It is quite large at 13" x 5" and the top flips back to allow you to put your candle hold of choice in.  I decorated all four sides of the gazebo, a rather ambitious undertaking! 

I added some folded roses out of soft yellow pearlescent strips and punched leaves to continue the arbor feel.  The fuchsia flowers were made by quilling and shaping four coils into a "s" shape marquis for the top of the flower.  Then I quilled a bell shape, gluing the inside to keep it's shape and added some flower stamens.  You could use quilling strips for this if you like.  Another small marquis for the very top of the flower and then some quilled leaves and tendrils.

The very top of the gazebo has just a small amount of embellishment because of the heat that rises from the tea light and I didn't want any problems with paper and fire!! After testing it and watching carefully, the openness of the top didn't pose any problems with the few quilled flowers at the top.  I used the purple ribbon from the kit to finish off the finial.  It casts a pretty pattern of candlelight when lit.  Hop on over to Custom Quilling and see what other projects have been made with this months kit for your inspiration!

I have been working away and have about a weeks worth of cards already finished! I got a new toy and have been playing with it.  I will show you in another post along with the cards the next few days, so check back and see. 

Shalom,
Sonya
Your comments a so appreciated, thanks for visiting!

Monday, July 5, 2010

Day Lily August Calendar Page

Hi all, back with the next installment of the floral punch and quilled perpetual calendar.  I can't believe that I have only one more month to go before it is finished!  Again this one was made from supplies in the July Custom Quilling kit.  I used the soft peach card stock from the kit to make these summery day lilies.  They were punched using the lily punch that Denise carries in her store and chalked with Pan Pastels in yellow down the center of each petal.  Then I took an Adirondack pen in a brown/red color and added the dots close to the stamens.  The leaves of the lilies are from the same punch.  The stamens have nutmeg Flower Soft on them for a realistic look.  Next I quilled birds foot shapes and glued three of them together and layered two of these together with a pearl in the center for the accent flowers.  The bright yellow strips from the kit were used.  A lily bud in the top corner finished off this page. 

This months kit has a generous assortment of quiling strips in sunny yellows and stunning purples along with a nice collection of card stock and butterfly designer papers.  Tomorrow I will post the gazebo that has quilled fuchsias on it. Stop by Custom Quilling and see the July Newsletter for more projects using this months kit, Sue my DT sister has some great ones! Hope you have had fun with the calendar, if you have made one of your own, post it in the comments section below this post.  I'd love to see it!  Until then,

Shalom,
Sonya
Comments encourage my creative urge! Thanks for all of yours!

Friday, July 2, 2010

Fireworks Miss Bitty

Hi all, I can't believe that I haven't posted in so long. Seems that I have been busy and have been making projects that I will post all this week. I have had to rearrange and reorganize my craft room with new shelves and tables because I have a new toy - a Cricut Expression and have been playing with it!  It is so much more easy to put things where they belong now since they actually have a place to go!

Today's card is made with some of that playing around.  I used Little Miss Bitty from Fred She Said and colored her with my Prismacolors and OMS in red, white and blue.  She is glittered up and has sparklers attached to her antennae.  I wanted there to be fireworks, or something that looked like them, so I used the Storybook Cricut cartridge and found the dandelion frame that kinda looked like it.  I then glittered the ends and layered another glittered frame on it for a firework explosion look.  Little Miss Bitty is popped up on top of these layers with her "OH" expression.  The USA panel and letters were cut out from the same cartridge.  I used a very sparkly silver holo paper for the base mat of the card for some real bling!

The inside of the card is decorated with the same frame and also two of the dandelion flowers cut out of the holo paper.  This paper can be peeled off the white backing and can be used as a sticker which is what I did for the "fireworks" on the inside. Enjoy your 4th of July and remember all of those who are keeping us safe and free!  I'll be back tomorrow with a quilling project and be sure to check back all this week for more cards and quilling!

Shalom,
Sonya
Thanks for all your sweet comments, I appreciate each and every one!