Pages

Showing posts with label My Creative Classroom. Show all posts

Tuesday, February 7, 2012

Quilled Blue Malaysian Flower Necklace


Wow, it amazes me how time flies!  The last few months of last year were really busy, taxing and just plain crazy.  And, while I had projects for Custom Quilling (this is one of them), I did not post them.  I want to thank all who follow my blog and apologize for not attending to posting and I DO appreciate you stopping by to visit my projects!!!!  Sometimes it is hard to "get back into it" as they say after an absence. 

So I will catch up on the projects not posted and then start with fresh ones for this year!  I have been lurking around the web and have seen some amazing quilled projects from all over the world.  Quilling is really coming into it's own with some unique styles from this new generation of quillers!


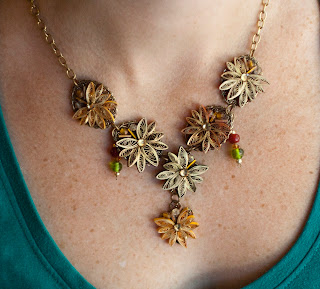
While browsing some those world wide quilling sites I found this little flower that is called a Malaysian Flower.  So called for the Malaysian quillers who created it and use it in some beautiful projects!!!!  Here is a link to the flower tutorial (scroll down to find it).  I decided to use it in a necklace and this time not gild the edges with metallic paint.  I loved the blue and white color pearly papers and I think it makes a striking statement. Click on pictures to see larger view. 

I wish I could capture the sparklyness (I know that isn't a word lol!!) of the crystals and dangles.  Even the flowers shimmer from the pearly papers.  These flowers are easy and fun to make and I know I will be using them often as they are lovely in any color combination.


My first online quilling class for My Creative Classroom was such great fun!  I loved the students and am looking forward to seeing their quilled projects for years to come!!!  I will be adding new quilling project classes in the coming months, but for now my original class, 
Quilling, Twirled Paper!
is being offered again and is open for enrollment now here.  Classes start March 2, 2012 but you can start after the official first day of class.  You can see a description of the class, a supply list and kits on the link above. I am looking forward to the new class and hope to see some of you there!  If you have any questions please email me!


More posts to post in the coming days, so check back soon! Thanks for all the comments that everyone left for me in my absence!!

Shalom,
Sonya

Wednesday, October 5, 2011

Falling Leaves Quilled Necklace


Hi everyone!  I have neglected my poor little blog and will be posting about the same amount for a couple of more weeks. I am working on the classes for my online quilling class for My Creative Classroom and there are two more weeks to go. So after that I should be back to posting regularly : ) !  

I do have a post for today though and at the first of each month I have projects that I have created for the Custom Quilling Newsletter.  The kit for October had beautiful fall colors in it and I couldn't resist making another jewelry piece.  I used oval filigree jewelry pieces as my base for the quilled leaves.  Each quilled gold gilded leaf gives a flash of fall color when seen from the side. 


The leaves are "falling" down the necklace to the last one that dangles.  Fall color beads dangle amongst the leaves while beads and crystals give it sparkle. I am very ready for fall and we are just now getting some milder temperatures here in Texas, although not any rain!  This is my first online class and I have been enjoying it and the students so much, and they are doing so well!!!  Some of the students have quilling experience and others are just trying it out for the first time. They are very creative and their projects are wonderful!

I still have two projects from the newsletter that I have ready to post and I will get them up later.  Thanks to all who visit and leave such nice encouraging notes!   See y'all later!

Shalom,

Sonya

Thursday, August 18, 2011

Quilled Decorative Bottle

Hi all, I have another project to share using the new technique, curled loops (tutorial here).  I love pretty glass and when I saw this red one I new that I had to make a project with it. I used the decorative paper and strips from the August Custom Quilling kit to make the embellishments.  Simple 6 petal flowers are accented with curled looped flowers upon the bottle "label" that wraps around the middle of the bottle.


This time I didn't encircle the loops and curled them for a fan like shape.  I really like this technique it has soo many possibilities. I added a bit of the same to the neck of the bottle along with a tassel.


Try this new technique and post your picture links in the comments!  I have put a link to my online quilling class with My Creative Classroom, Quilling, Twirled Paper! on the sidebar.  Registration is now open and the class starts September 15, 2011.  You can register after the class opens and you have access to the class lessons, gallery until December to finish up.  If you have any questions about the class or projects, just email me at appelquillinggarden@yahoo.com .  Another project tomorrow.

Shalom,
Sonya

Tuesday, August 16, 2011

Quilled Letter Holder

Hi all, I have neglected my poor little blog but have been working hard behind the scenes getting my online quilling class for My Creative Classroom ready for registration. It is now finished and I am excited that I can now reveal the link to the class.  But first the project above that I made for the Custom Quilling Newsletter this month.  I used a purchased letter holder and added the quilled embellishments.  The technique that I used for the center flower was from this blog and it uses looped flowers in a new and very pretty way.  Asma has a great tutorial on how to create them plus many wonderful projects using them! Stop by and visit her blog you will love her projects. I know I will be using this technique again.


Now for the quilling class, it is named Quilling, Twirled Paper! It will cover the basics, intermediate and some advanced quilling techniques and will be 6 weeks long.  There will be a class project(s) each week with week's 5 is a quilled keepsake such as I feature here on my blog.  Week 6's project is a quilled necklace that used the technique that combines jewelry pieces and quilling such as this one.  You can visit My Creative Classroom Quilling, Twirled Paper! class site here to see the full description, cost, and supply list (which Denise at Custom Quilling has a copy of and can help in ordering any supplies, Thanks Denise!).  If you have any questions about the class, just email me at appelquillinggarden@yahoo.com and I will be glad to answer. There are also many other wonderful papercrafting classes offered this fall through MCC.

I should be back to creating on a regular basis now that the class is up for registration.  I will be back tomorrow with more projects!  Thanks for all the comments, I have and do read them all.

Shalom,
Sonya

Thursday, July 21, 2011

Back Again!


Hi everyone, sorry for the long MIA.  I have not been blogging, but I have been working on a project that has been taking a lot of my attention and that I am excited about.  I'll tell you about that in a just a minute.  First I want to share a project for this month's Custom Quilling Newsletter, an altered ribbon spool with a quilled fan.   I have seen several of these altered spools and have been collecting them to try my hand at one. 


I used the shades of pink strips and card stock that came in the kit to create the fan and floral punch flowers.  I used a quilling grid with circles and angle lines to lay out the spirals that make up the spokes of the fan, pinning them in place.  I then made the looped portions at the top of the fan, again pinning to hold them in place while drying and keeping the fan shape steady.  The two wing butterflies in the middle give the fan more stability as well as the teardrops between the spokes where they meet. A gold tassel hangs from the bottom of the fan.


It is a delicate design and if I do one again I will have to make adjustments to the double spiral spokes.  You can see that a couple of the spirals are separating.  I think I needed to glue the ends together so that they stay spiraled next too each other and do not separate.  But, that is for next time.  Three teardrops and a flower help stabilize the point where the spokes meet even more.  At this point I could un-pin the fan and it held it's shape well.  A few more tear drops at the tips of the spokes and some bling and it was finished. 

The spool was covered in decorative paper around the center and has scallop circles out of the same paper on the ends.  To cover the bottom end I die cut the center of a scallop circle with a circle die the diameter of the center, cut between two scallops and hid the seam with embellishments. I wound the wide pink ribbon from the kit around the spool and added pearls, buttons and lace at the ends.

Next came the more quilled flowers and butterflies mixed in with the pink lilies.  Aurora crystals, more buttons and pearls make it frilly and feminine. 

Now for the news that I have been waiting to tell you about.  This fall I will be teaching a 6 week quilling class with -


 I had taken two Tombow marker background classes through MCC and loved the format, the classes and the teacher, Kim Teasdale! The class was online and while I was considering taking a class, I wondered if it was going to be worth my time and cost.  It was and I was not disappointed!  There was a lot of content, easy to follow and understand and you feel as if the teacher is right there giving you private lessons even though it is a PowerPoint presentation with added videos.  Kim, as well as all the instructors, were also there to answer questions and give feedback on our projects that were posted to the class gallery.

There are many like me who would like to take a class but have no teacher close by or giving a class when you would like to or able to take one.  I wish there had been a class like this when I first started quilling. One where the basics of quilling, using the tools, through the varied techniques of husking, looping, 3D etc. were taught and demonstrated.   The online format with MCC gives you that opportunity and the freedom to sign in on your schedule and view the weekly lessons when the class semester is open.  And you have the added time of two weeks after the last posted class to go back and review any lesson, post your projects, get questions answered, and download the class PDF lessons.

The class that I will be teaching is 6 weeks and covers quilling basics, using the tools, shaping coils, fringing, domes, bells, folded roses, looping, husking, 3D quilling.  Each week there will be a guided project to showcase your new quilling skills. The last two weeks you will be completing a Keepsake quilled project and I will teach you the quilled jewelry technique that I used to make the necklaces and bracelet posted here, here, and here.  All with class lesson PDF's.

The class will be open for enrollment on August 23rd 2011 and I will have more info later. Until then, if you would like to get a preview of the projects and explore the other classes at My Creative Classroom click here. and see if the classes are a match for you. And anytime you would like to go to MCC to see what great classes are offered, from my blog, just click the MCC blinkie on the right sidebar.  If you have any questions please email me at appelquillinggarden@yahoo.com.

Tomorrow I will post another quilled jewelry project.  Thanks for all the sweet comments while I was MIA.

Shalom,

Sonya
Your comments are read and appreciated!