Pages

Showing posts with label Gift Bags and Boxes. Show all posts

Monday, December 13, 2010

Icey Flower Box

 Hi all, back with another project perfect for your gift giving!  I saw this little cute box here on Cricut Chick's blog, and had to make one, or more! It won't be the last time you see it!  It is easy to make if you don't get too ambitious with the embossing powder like I did and emboss EVERY panel!  The box uses a 12 x 12 sheet of card stock and three different pattern papers.  The link above has a great tutorial so I didn't think I needed to reinvent the wheel with another one.  It can also be made smaller for smaller items. 

 I tipped it up so you can see the Fred She Said Icey Flower, pre-colored, image that is on the four sides. Using these pre-colored images is a time-saver and they are sooo pretty and easy to use! I printed it out and then cut out the three layers then glittered them.  I used pop dots on the bottom layer and just folded and glued the top flower layer onto it, adding a blue crystal.  The flower medallion is mounted on a Nestie scallop circle. 

I had a question on what kind of printer and paper that I used to print out my digi images with.  I print them out on Canon Pixma Matt Photo Paper, MP-101 and use a Canon ip2600 printer.  I never could get the vibrant colors to print right on plain printer cardstock.  When I changed to the matt photo paper the colors popped and were perfect!  The right paper makes all the difference.

The panels are all embossed with a mix of white and silver holographic tinsel embossing powder and has a nice sparkle, which unfortunately the camera isn't capturing.   The glitter on the flowers is Diamond Dust clear.
You can see the inside of the box in the above picture with the wire ribbons and tulle tied to the elastic that is holding the box sides up. I think I will go back and put more ribbons on the top as it isn't as full as hers. The tutorial link has a video also that shows how this is done.  The box is roomy and would look great with homemade treats tied up in pretty cellophane in each of the sides. Or, put paper shreds in the bottom and fill the box with gifts of your choice. It is a very versatile box and could be embellished all sorts of fun ways!  If you make one link a picture of it in the comments, I'd love to see it!! 

If you haven't visited Fred's (Tracey) site lately, drop by and see her latest post and freebie, click here to see the cute angels! A lot coming up this week so drop back by for a visit.  Thanks for all your encouragement on my last post, you will see more of the quilled jewelry!

Shalom,
Sonya

Monday, April 26, 2010

Fred She Said April Challenge Purple Gift Box

Hi all, back with this months Fred She Said Challenge - A 3D gift for a loved one.  So here is my project to get you inspired, another of my little altered soap boxes, with a different look than the last.  This box is in beautiful shades of purple and I thought it would be perfect to show off the Fred She Said Lovely Blossoms Decoupage set. The full sheet of pre-colored flowers and leaves were printed out on vellum for an airy and vintage feel and is also similar to parchment craft.

First I outlined the flowers and leaves with my gold gel pen to give them an embossed look.  Then I layered two and three different sizes of the purple blossoms together after shaping them on a foam matt.  Next I added some light purple glitter to the petals and crystals for the centers.  The smaller white blossoms were left as a single layer and have dew drops as their centers. 

I am showing the same view of the box because my camera is skewing the colors a bit and this one is the closest to the true colors.  Again all I had to do to cover up any writing on the boxes was to just cut some card stock panels for the top, bottom and inside of the box lid.  Ribbon and die cut accents finish off this gift box that is a gift in itself.  Using the Fred She Said digi flowers made it quick and easy!

Now hop on over to the Fred She Said Challenge Blog to see what the other DT members have created for your inspiration! Now for the CHALLENGE details:

FRED SHE SAID APRIL CHALLENGE
A 3D Gift for a loved one!

You must use a Fred She Said digital image somewhere on your card.

This challenge will begin today and end on May 30th, the day before a new challenge will be posted!

See the FREEBIES section if you don't have any Fred She Said images right now.

Please use the Mr. Linky widget on the Fred She Said Challenge Blog to fill out your entry.

Please give the exact link to your post or photobucket/gallery image of your entry ( not just to your blog). It makes finding it a lot easier ;)

If you don't have a blog and would like to email your entry please send your card image with your name to Tracey and she will add your entry to the Mr. Linky as well as link it to a photobucket so others can see your wonderful projects :) Please, one entry per person for this challenge.

The prize again this month is...

a $20 gift certificate for the Fred She Said store! How sweet!

So get those entries in and remember you have until Monday May 30th to get it done! We are looking forward to seeing your creations this month!!!

New challenge coming up on May 31st!

Here are the links to the Fred She Said STORE (Owner Tracey Lynn Miller) and the Fred She Said BLOG, and Fred She Said Challenge BLOG (where you need to enter your project).

Good Luck!!!

Shalom,
Sonya
Remember comments and links here, while very welcome and appreciated, do not enter you for the Challenge, only those left at the Fred She Said Challenge blog do!

Thursday, April 22, 2010

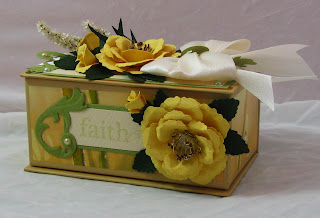
Yellow Rose Gift Box

Hi all, I'm back with another project, an altered box with floral punch flowers.  A friend gave me several cute soap boxes to alter and give new life to.  I covered up all the writing on the box with layered panels and that still left a lot of the boxes original colors and beautiful paper covering.  Next I made the yellow roses and buds using the begonia punch from Punch Bunch. 

I added some Stickles in the center of the roses for sparkle and dew drops with Crystal Effects.  The floral stems of lacey white was made with a mini snowflake punch also from Punch Bunch.  I stamped "faith" and "hope" on the front and back panels, pearls, creamy double bow and flourishes from Spellbinders to finished up.


It is a fun and quick recycle project and the gift box is a gift in itself! You will see more of the little boxes in the future, I so much fun making this one.  Back later with another card that I made for an online course that I am taking.

EDIT TO ADD:  Had a question about where I got the soap boxes, a friend gave them to me and I believe that she purchased the "designer" gift soaps w/boxes from Marshall's.  So look over those sale aisles in these types of stores, you never will know what you will find that can be altered!

Shalom,

Sonya
Comments are always welcome, I love hearing from all of you!! Post links to your recycled/altered projects in your comments!

Thursday, March 11, 2010

Pink Quilled Flower Purse Gift Bag and Quilling Tutorial- Eccentric Circles


Hi all, here is my first quilling tutorial. The details of the above project will be at the end of this post.  From the looks of the poll most want a written tutorial, so this is the first requested one, eccentric circles.  I will try my hand at some video tutorials later though because I am a visual learner and I know some of you are too!  But, back to the tutorial.   The double and single layered flowers in the picture above are made with quilled eccentric circles.  Note to self, check the pictures out for any embellishments that may have been moved around during the picture taking process, see pic below, do you see it! lol!
Ok, back to the tutorial.  You start with an open coil of your desired length.  The longer the strip, the more "quills" (loops) in your flower petals or shape.  The ones in the picture above are from a strip of 8". 

This one is from a 6" strip.

Next you take a straight pin and on surface that you can pin into, insert the pin tip into the center of the open coil and pull it to one side as below.
Tip: You want to pay attention to where your have closed your coil.  You want to be able to hide this joining in the quilling.  So decide before you do this what shape you want or how you will hide it in the design. If you are going to shape the eccentric circle with the center at the bottom or at the top, you could put the joining spot where it will be hidden by your flower center or where it attaches to another quilled shape. 

Put another pin on the outside of the coil right beside the previous pin holding the center of the coil to the side, see picture below.
Next take a small toothpick or pin and put a small amount of glue where the center coil is pulled to the side, in between the pins.  You want to make sure that the center of the coil has glue on it or it will not stay put, see glue on coil below.

Let this dry and then remove the pins.  You can see the glue on the coils in this picture (these coils have been made with a full strip, see how many loops there are).  This will be the back side of your coil/shape. Your coil should hold it's shape with the center glued to the side and should look like this:


These shapes will be shaped into a petal with the center of the coil at the pointed end of the petal.  So to make these, just pinch the end with the center into a point.  Because of the bunch of strips this point probably won't be to pointy!  Also you can pinch the opposite side of the center and it will look like the pink flower pinned next to the purple petals. The pink one is glued and pinned to get a tight center at the points.

Next you can either can glue it and pin it together like the pink one or you can make a fringe center and glue the petals to it, or on top of the flower, see below.  Look closely at the ends of the petals and you will see what I mean about the coil joining spot. You can see it below on several of the petals.  So decide beforehand where it will be in your shape.  You can hide it at the point of a shape or as I said before in the center of the flower under other quilled shapes.


The next picture is the same double layer flower as is on the purse gift bag at the first of the post, but without a center. To get this look just make your eccentric flowers using a larger length strip for the bottom flower and a shorter length strips for the top flower and glue on top of each other and add a center of your choice.


These shapes can also be shaped with curled tips and I made this little orchid from 6" strips and put a quilled bell shape for the mouth of the orchid.  You are only limited by your imagination to how to use these eccentric circles.  Experiment with sizes and shaping, it's fun and you never know what you may come up with!


Details of the Pink Purse Gift Bag.  This is the last of the projects for this month's Custom Quilling Newsletter.  I used the same flowers as was on the Spring Verse but used buttons for their centers and only used one double layer flower.  I added the pearls and faux stitching a beaded handle and little tassel to finish it off.  The purse itself is a Sizzix die and is easy to put together and embellish with quilling and edge punches.

Since this is my first tutorial I want to make sure that it is understandable and clear, please leave me some feedback on it.  Was it clear? Could you reproduce an eccentric coil after reading how to do it?  Any other suggestions or requests.  Thanks for your feedback, I want to improve my tutorials and give you the best instructions and answer any questions you may have!  Also a request, please pray for my sister as she has lost another child at 12 weeks, they named him Anthony Benedict.  They are grieving and having a hard time, thank you lifting them up to the Lord.

Shalom,
Sonya

Sunday, February 15, 2009

Quilled Lavender Sizzix Take Out Box


This is one of my new dies, the Sizzix Take Out Box. It is a smaller version of the ones you get at the Chinese restaurant. I think that they are so cute and versatile. You can use them as a small gift box or as a table favor! I haven't been inspired much of late as you can tell by the lack of projects posted. Sometimes it doesn't come easy! I have to play with the designs until I get it in the direction I want it to go. This little boxes are great for that. There are so many different ways to decorate them, simple, all out or anywhere in between. This box takes one 12 x 12 piece of cardstock and I would use one that has a solid core as the score lines and folding can show the inner white core as mine did here.

I must be on a purple streak because I went straight for the purples again! The decoration on the front was cut with my scallop Nestabilities out of purple metallic cardstock layered with a light purple pearlescent circle. You will see more of this metallic cardstock in future posts, I really like it! The quilling is set on the last white scallop layer. There is a scallop layer on top of the box stamped "Celebrate" in gold embossing powder. Both scallops layers are raised with dimensional's. The handle is a lightweight silver wire with small clear beads attached through the sides with small eyelets.
The quilling has a purple 6 petal flower accented with a lavender crystal flower. The fringe flowers are a graduated from dark purple, purple, lavender to white. Punched flowers have a lavender pearl as their centers. The punched fern is green vellum with shimmery gold. More boxes are coming in the posts this week. I love playing with all the possibilities!
x
I have added an email contact on the sidebar especially for this blog and you can email me about any piece. Look in the links bar often as I am going to be adding other great quilling and cardmaking sites and blogs! There are so many talented paper artists that inspire me! Thanks again to all who leave such kind and encouraging comments, I love hearing from you.
x
Until the next post,
Shalom,
Sonya
Comments are always welcome, drop me a hello!