Pages

Thursday, October 21, 2010

Quilled Pecan Pie Slice Treat Box

Hi all, it seems I can't win for losing with the health issues.  The pollen count is really high here in Houston and there hasn't been any rain to wash it away.  Which means ALLERGIES!!  I have had a really annoying and interfering allergy attack this past week and hadn't felt like doing anything.  I worked on two projects and didn't finish either one. Good thing I have some projects ready by not posted and here is one of them, a quilled pecan pie slice treat box. 

It is one of the projects that I made for the September Custom Quilling Newsletter.  When I saw the rich brown card stock in the kit I knew I wanted to use it to make a pie slice.  I quilled two coils and shaped them into a "D" shape with slightly inward curled tips.  Then a smaller coil was shaped into a marquise and used as the center portion of the pecan slice.  Two different colors of brown strips were used for contrast on the pecans. 

The crust of the pie was made from shaping quilled coils into a "C" shape, gluing two together to build up the height.  Then alternate these to form the pinched crust look.  You could even make it three high if you wanted a taller crust.  All of these quilled shapes were put on top of a pie slice treat box cut from my Cricut using  Tags Bags and More and the top of the pie slice box from the Tie the Knot cartridge, for the "doily" plate. 

I added a wide gold bow just behind the crust and added another pecan slice on it for an accent.  You can make it smaller or larger if you want and fill them with your favorite treats, it opens at the back.  Easy and looks real, or at least my grandson thought so! It was so fun to make I am sure I will make more versions.  Well I am still fighting the lack of energy because I can't breathe but I am GOING to finish those two projects tomorrow!!!  Back with another project,

Shalom,
Sonya
Thanks so much for the encouraging comments and for those who are waiting for the Tie Fighter file,Thanks for being patient, it is coming!

Thursday, October 14, 2010

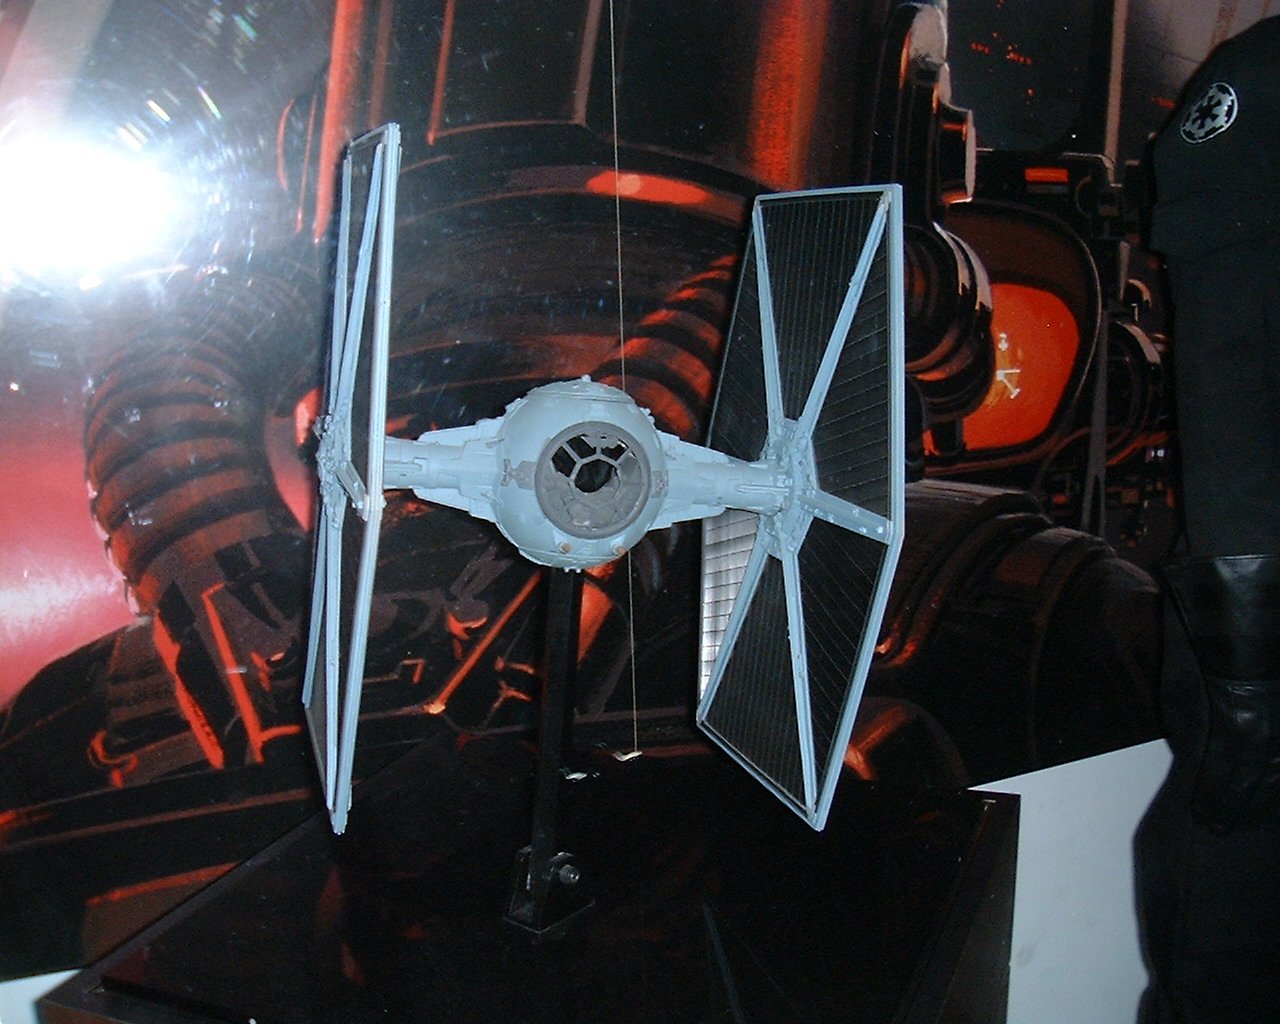
Tie Fighter 3-D Cricut Cut


Hi all, This is for all the Star Wars fans out there. I'm back again with a project that isn't my normal card type project. Being able to create items for family and friends for those special days and events is one of the benefits of paper crafting.  My #1 SIL's birthday was the occasion for this project and pushed my 3D construction experience.  He is a big fan of and loves anything Star Wars.  I knew I wanted to come up with some paper craft item for his birthday in the Star Wars theme and had considered a card.  Using my Cricut was going to be a given and there is not much in the way of designs to choose from in this category.  I had wanted it to be out of the ordinary and considered a pop up card but then I remembered seeing a paper 3 D tie fighter gift card holder on the internet, see link here. But, I wanted a little more of the realistic look for it and out came my Sure Cuts A Lot2 to attempt to make one. 

The major hurdle for me was the ball shape of the cockpit and I am definitely not an engineer!  Recently I have been researching pop up cards and such and had come across a pop up ball pattern.  Well it didn't need to be pop up just keep it's round shape, so I studied the pieces and shapes that made the ball and went to work combining shapes that could be folded and glued together to form a ball. Actually it is a hexagon shape see here. After several trial cuts and revisions I had a one piece hexagon round box with open ends that could be covered with another hexagon shape to close it up. 

The hex ball was originally designed to hold a gift card and it is just a tad bit small to hold it!! From wing tip to wing tip it is 8" and the wings are 8 1/2 hexagons.  It was cut on a 12 X 12 mat and the one piece design just fits on it.  So, to get a bit larger ball it would need to be cut on a 12 X 24 mat for a one piece design. Or, I think I will just make it two pieces that attach to match the original one piece design also so it can be cut on the 12 X 12 mat.

After that hurdle was finished I then tackled the arms for the hexagon panels and was relatively easy, a rectangle with tabs on each end to attach it to the hex panels and ball.  Those large hex panels are not exactly the same scale as the picture and can be made larger, but for the purpose of a gift card holder it works. After working on the layered window, black triangles on the hex wings and arm struts, I had a working model that seemed to work!  Only one problem, the gift card didn't fit inside!!!  So we put the good old standby in it, real money!  I had worked on this all day and time was running out before the party so I left the last tab on the ball unglued so that he could retrieve the money inside since I had no more time to add a flap closure.  I closed it up the next morning for him. There are some changes and tweaks that I need to make to it to have a truly sturdy and perfected design for it to be a gift card holder.  It can be made smaller and hung from the ceiling with the tab option on the perfected design.

When I revamp the cut file I will post another picture of it.  Being in a hurry and trying to accomplish something the day of that I had never attempted before doesn't lend to getting it perfect!  I think it could use a little more embellishments, like some small grey/antique silver/black brads for "bolts", a transparency layer for the window, something else on the black triangle panels, more detail pieces etc.  This will be done on the next "model"!  All of the pieces are scaled to work together so if another size is made, all the pieces would have to be grouped together and resized as one group to get the right sizes.  As I said it did take me all day to make this imperfect design and I will spend a bit more time making the perfected one. It will take me a day or so to get it done and uploaded to a download site, so please be patient.  Please remember that, and do not appropriate it as your own design! Star Wars is a copyrighted/licensed property and the design (and those modified from this one) can't be sold unlicensed, so credit for the designer (and modified ones) is appreciated. 

NOTE: When I get a perfected file I will post a download link on this post in red.

Since this size (will be posted in this size) is too small for a gift card to fit in and also for the smaller (resized) version you could make a gift card sleeve from this awesome Clone Trooper SVG file here.  She also has a Darth Vader version.  I will be making a Darth Vader Tie Fighter version also in the near future as my daughter said the grandsons wanted to decorate their room in Star Wars. I am already dreading the "Death Star"!!!!  Looks like I will be purchasing a lot of silver card stock! Let me know if you like it! I still have more projects finished and in line to show you!

Shalom,

Sonya


Thursday, October 7, 2010

Quilled Ecclesiastes 3:1


 Hi all, back again with another quilled project from the September Custom Quilling Newsletter.  September's kit had papers and quilling strips in shades of black, greys, white and cream along with some really pretty designer papers in shades of brown and faux stone designs.  I choose one of these papers, the clock design, which fit perfectly to use as the background for the quilling embellishments for Ecclesiastes 3:1. Along with the quilled and punched flowers I wanted to add another distinct themed element to the project and a quilled clock was the natural choice.  


I quilled a wide tight coil from several cream strips to get the clock face and added the black half pearls for the numbers. The hands of the clock are made from wheatear loops and a small shaped marquis for the point.  The outer rim of the clock has tight coils and u shape loose coils facing each other.  Then I wrapped several strips around them to finish the round part of the clock face.  Some filigree accents on top and bottom give it an ironwork look.


The rest of the quilled embellishments are simple teardrop and marquis flowers with black pearl centers, fringe flowers and punched vellum flowers with white pearl centers.  A few shaped leaves and spiral coils finish the frame around the computer printed verse that is cut out with a die cut.


In the picture above that is taken at an angle you can see dimension of the quilling and how the clock face is popped up with dimensionals.  I just need to pick a frame and it will be ready to display and contemplate when "those" times come into my life!  I still have several more quilling and cards projects finished and waiting to post so check back.  Thank you for your comments and answer to my question on the last post.  If you didn't get a chance to answer it, please do so any time, I always love feedback to improve my little blog!

Shalom,
Sonya

Friday, October 1, 2010

Red Roses


Hi all! Did you have fun hopping through the wonderful projects the FSS Design Team had for you?  If you haven't yet you still can, just see the post below and have fun!  Today I have another Fred She Said card for you, I previewed it on my new blog header above.  It was originally made for a contest but I didn't get it finished in time but I still can share it here! 

I used the Fred She Said Roses and leaves svg cut file and cut the flowers and leaves out in several of the shapes and sizes on my Cricut.  It is easy to resize the designs and make the flowers any size you would like.  The roses were cut out in red card stock and sprayed with Candy Appel Glimmer Mist which has a golden shimmer.  They then were shaped, layered and glued together.  The centers of the roses are black seed beads to give them even more glitz and interest.  The rose leaves are cut out in black card stock and inked with gold on their edges and have embossed veins.
The card base is 6 X 6 square and I took my round dies and traced out a wave pattern on a 6 X 6 piece of scrap card stock and cut it out for a pattern.  Then I lightly traced the pattern on the card base front and used scissors to carefully cut off the wavy edge.  I used the pattern again to cut a layer for the front by tracing it again on a 6 X 6 piece of card stock and then cutting the wavy edge off again, then cutting a 1/4" strip from the other two straight sides.  It was then embossed with the Swiss Dots Cuttlebug folder and the layer as well as the card base was edged with a gold gel pen.


The wavy cut show the inside of the card when shut and there is another white gold edged layer on the inside of the card.  I placed the sentiment on red, black, gold vellum scallops and circles cut with dies.  White gel pen dots and black Pigma pen dots highlight the scallops along with a red crystal to accent the sentiment.  With the wavy edge cut away when the card is opened you still see the sentiment embellishment. The left side of the inside has a stamped image in Distress Fired Brick accented with red crystals.

For the finishing touches I cut a butterfly in black card stock added some gold gel pen dots and perched him atop a bow with three loops.  I like the way the cut out shape on the side looks and I'll have to do another!

Thanks for all the comments from the blog hop, sooo encouraging!!  Posting is a balancing act as to how much or not to put in a post.  Some like detailed descriptions others just want to see the card! So to keep things balanced, would you please let me know in the comments what you prefer, a detailed description; less description and what kind of info?  It would really help me to know just how much to put in a post and have the Goldilocks amount for everyone!  As usual if you have a question about any technique or supply used just email me on the link on the sidebar and I will do my best to answer it. More projects tomorrow!

Shalom,
Sonya
Love to hear from you!

Thursday, September 30, 2010

Pumpkins and Sunflowers FSS September Blog Hop


Hi all, as promised I am back with the Fred She Said September Blog Hop!  The Design Team Girls have some great eye candy for your inspiration so if you want to hop from the start you can click here.  Here are the details for the hop:

The theme for this blog hop was for us to use our favorite Fred She Said image in your favorite YOU style. This is the first blog hop with our New Team and I am sure you will see some fantastic STYLE!

As you hop from blog to blog, collect each Design Team member's special CODE WORD listed in their post and make a complete phrase.  On the last blog hop stop you will find instructions on where to email Tracey-Lynn with the completed phrase.  The winner will be selected from all the emails that she receives.

PRIZES: $20 CAD from Fred She Said Store AND $20 Gift Certificate for CropStop, http://www.cropstop.com/ !

We all love comments and would love feedback on our projects! Please feel free to leave comments, suggestion on a project, technique or anything you like on the Design Team's posts.

Here is the Blog Hop Order in case you lose your way:

Tracey-Lynn -  http://fred-she-said.blogspot.com/

Nancy - http://inspiredbystamps.blogspot.com/

Shelly - http://jaspere-jaspereslittlecorner.blogspot.com/

Anne - http://stargrovesblog.blogspot.com/

Tracy - http://iwannabuildamemory.blogspot.com/

Sonya - http://appelquilling.blogspot.com/ That's me, Your HERE!

Maria - http://joyfulstamper.blogspot.com/

Lora - http://lorascards.blogspot.com/

Michelle - http://inspirationblooms.blogspot.com/

Marlena - http://www.marlenaspaperparadise.com/

Darsie - http://craftingwithdarsie.blogspot.com/


Fred She Said Challenge Blog - http://fss-challenge.blogspot.com/

Here are the details of my project:

We were to create a project with a technique or image that we love to do or just love!  Tracey's colored images are sooo pretty and vibrant I love to paper tole them, so that is what I did with this gorgeous pumpkin and sunflower image.  You can see from the picture above and below the layers of the pumpkin image. Click any image to enlarge.


It was printed out several times in the size that fit my design.  Then each layer was cut out and layered onto the next one with a dimensional silicone glue (you could use foam tape etc.).   

The image has beautiful sunflowers and I used my Twinkling H2O's to watercolor on coffee filter paper and dies to make the sunflower accent flowers which have a bit of Flower Soft centers.  The flower leaves edges were embossed in gold embossing powder and crystals added for a bit of shimmer.


The inside of the card holds another of the pumpkin images along with a verse sentiment from the set. I love this set of digi images and it is so versatile for any fall crafting and decorating!

My special CODE WORD is MEET !

Your next blog hop stop is at Maria's blog at  http://joyfulstamper.blogspot.com/ she has an awesome project for you! I hope you enjoy the hop and meeting the new Design Team members and visiting again with the veteran Fredders, sharing their special styles! If you want to see more Fred She Said images click here for the store.

I had a lot of fun working with this image and the wonderful way that it lends to paper tole.  Visit me again I have several more cards and quilling projects that I will be posting this week!

Shalom,

Sonya
Thanks for all the sweet comments and have fun on the hop and don't forget to collect the special code words!!

Monday, September 27, 2010

Wedding Ensemble


Hi, all!! Back to posting again, thanks for all the prayers and patience with my absence, my husband is on the mend and doing well now!!!! So I can get back to crafting. A short post for today, one that I thought I had posted before the break but didn't. It is the second half of the Wedding Ensemble that I made for the Custom Quilling Newsletter.  Click on pictures to enlarge.


There are two quilled treat boxes, a bride/bridesmaid and a cake slice. A table place card, and cake knife (that is mine used 33 years ago!)
I used a purchased journal to make the Bride's Journal and quilled the flowers and cut the "Happily Ever After" with my Cricut.  Next to it is a paper cone embellished with a matching quilled bouquet that can be used as a favor or for treats. 

I have several other projects that haven't been posted and a blog hop coming up so check back, I'm back! Again thanks for all the support!!!

Shalom,
Sonya

Monday, September 6, 2010

Wondering what's up?

Hi all, thanks for all the love you posted while I have been taking care of my husband.  He is back on the mend now and we are hoping that it will last!  I have had to help him with his part time job, being his chauffeur and runner while he is recovering, it is wearing me out!!.  Since he is getting where he doesn't need that as much I will be back creating this week.  All that time from creating has zapped my creativity!!!  It is like I can't get a project together and it takes me so long to do, well, nothing!!! But today I have started a watercolor card that is about half finished and I also have the Custom Quilling DT projects to post also, tomorrow.  I just wanted to pop in and let you know I'll be back posting!

Thanks so much again!!!
Shalom,
Sonya