Pages

Monday, April 26, 2010

Fred She Said April Challenge Purple Gift Box

Hi all, back with this months Fred She Said Challenge - A 3D gift for a loved one.  So here is my project to get you inspired, another of my little altered soap boxes, with a different look than the last.  This box is in beautiful shades of purple and I thought it would be perfect to show off the Fred She Said Lovely Blossoms Decoupage set. The full sheet of pre-colored flowers and leaves were printed out on vellum for an airy and vintage feel and is also similar to parchment craft.

First I outlined the flowers and leaves with my gold gel pen to give them an embossed look.  Then I layered two and three different sizes of the purple blossoms together after shaping them on a foam matt.  Next I added some light purple glitter to the petals and crystals for the centers.  The smaller white blossoms were left as a single layer and have dew drops as their centers. 

I am showing the same view of the box because my camera is skewing the colors a bit and this one is the closest to the true colors.  Again all I had to do to cover up any writing on the boxes was to just cut some card stock panels for the top, bottom and inside of the box lid.  Ribbon and die cut accents finish off this gift box that is a gift in itself.  Using the Fred She Said digi flowers made it quick and easy!

Now hop on over to the Fred She Said Challenge Blog to see what the other DT members have created for your inspiration! Now for the CHALLENGE details:

FRED SHE SAID APRIL CHALLENGE
A 3D Gift for a loved one!

You must use a Fred She Said digital image somewhere on your card.

This challenge will begin today and end on May 30th, the day before a new challenge will be posted!

See the FREEBIES section if you don't have any Fred She Said images right now.

Please use the Mr. Linky widget on the Fred She Said Challenge Blog to fill out your entry.

Please give the exact link to your post or photobucket/gallery image of your entry ( not just to your blog). It makes finding it a lot easier ;)

If you don't have a blog and would like to email your entry please send your card image with your name to Tracey and she will add your entry to the Mr. Linky as well as link it to a photobucket so others can see your wonderful projects :) Please, one entry per person for this challenge.

The prize again this month is...

a $20 gift certificate for the Fred She Said store! How sweet!

So get those entries in and remember you have until Monday May 30th to get it done! We are looking forward to seeing your creations this month!!!

New challenge coming up on May 31st!

Here are the links to the Fred She Said STORE (Owner Tracey Lynn Miller) and the Fred She Said BLOG, and Fred She Said Challenge BLOG (where you need to enter your project).

Good Luck!!!

Shalom,
Sonya
Remember comments and links here, while very welcome and appreciated, do not enter you for the Challenge, only those left at the Fred She Said Challenge blog do!

Sunday, April 25, 2010

Dragonfly Thank You

Hi all, back again with a card that was done for an online class that I am taking.  The assignment was to use a die cut and ink that shape while masking the edges with the die.  Then we were to add some "stenciled" elements using a paper punch. 

The dragonflies were stamped with black Stazon and embossed with kaleidoscope embossing powder which makes them shimmer like real ones.  I colored them from the wrong side with my Tombow markers and added seed beads for their eyes.  I really like sponged background and the way it pops the white border of the die cut. 

Thanks for all your sweet comments I really love hearing from you! If you have a question(s) you would like answered about a technique or anything else, please leave me contact info in your comment (blog/site address etc.) or email me at the address on the sidebar so I can answer!

Back tomorrow with another assignment from the class!

Shalom,
Sonya

Thursday, April 22, 2010

Yellow Rose Gift Box

Hi all, I'm back with another project, an altered box with floral punch flowers.  A friend gave me several cute soap boxes to alter and give new life to.  I covered up all the writing on the box with layered panels and that still left a lot of the boxes original colors and beautiful paper covering.  Next I made the yellow roses and buds using the begonia punch from Punch Bunch. 

I added some Stickles in the center of the roses for sparkle and dew drops with Crystal Effects.  The floral stems of lacey white was made with a mini snowflake punch also from Punch Bunch.  I stamped "faith" and "hope" on the front and back panels, pearls, creamy double bow and flourishes from Spellbinders to finished up.


It is a fun and quick recycle project and the gift box is a gift in itself! You will see more of the little boxes in the future, I so much fun making this one.  Back later with another card that I made for an online course that I am taking.

EDIT TO ADD:  Had a question about where I got the soap boxes, a friend gave them to me and I believe that she purchased the "designer" gift soaps w/boxes from Marshall's.  So look over those sale aisles in these types of stores, you never will know what you will find that can be altered!

Shalom,

Sonya
Comments are always welcome, I love hearing from all of you!! Post links to your recycled/altered projects in your comments!

Saturday, April 17, 2010

Quilled "A"


If you are looking for the Fred She Said April Blog Hop, see the post below!

Hi all, here is another of the Custom Quilling DT Kit projects for April, an altered "A".  Sorry for the pics not being the best, I had a hard time with the lighting and getting the quilling to show well for some reason.  I purchased a wood "A" and then painted it a creamy white for the base of the quilling.  The quilling strips are a beautiful gold and yellow/gold metallic.  The combination reminded me of antique quilling projects that I have seen and so I decided to go with that theme. 


The large flowers are husked with a domed coil center and there are smaller husked buds.  These are paired with teardrop leaves and curling vines.  The teardrop flourishes help give the design that antique feel while the fringed flowers and the punched metallic accent flowers with pearl centers update the design.


I loved doing this projects and working with these rich metallic strips and you can find the April Custom Quilling Kit here, that has more wonderful supplies in this regal color theme.  Choose smaller letters for a whole name or just three for a monogram look, there are many other alterable items that you can embellish with quilling to give as gifts or use in your home decor.  If you are looking for the Fred She Said Blog Hop, see the post below!  Thanks for all the great comments for my creation for the blog hop, y'all are all so sweet and very encouraging!!!!

Shalom,
Sonya

Thursday, April 15, 2010

Pink Tulips Mother's Day

Hi all, we went camping for a few days to get away and see the beautiful display of bluebonnets in the Texas Hill Country.  Pictures do not do them justice, the color and smell of the waterfalls of blue that cover the hills are spectacular!  We had a great time and are rested and refreshed!  Below is a picture.


I finally finished this card for the Fred She Said Blog Hop and here are the details:

Welcome to our FOURTH "FRED SHE SAID" blog hop!!! If you just happened to drop by my blog and you are not aware of this wonderful event taking place, please go back to the "FRED SHE SAID" blog here ( http://fred-she-said.blogspot.com/  ) and start your hop!

Please, we would love it if you commented on our posts.

Along the way, please leave a comment on the blogs, follow the instructions at the end of the blog hop, at the Challenge blog, to make your entry and your name will go in for a draw for a $20 Gift Certificate for the Fred She Said Store!
Here is my "Fred She Said" creation:


I used the tulips that Tracey created for Stars and Stripes Operation Write Home  for this mother's day card.  The image is printed out on water color paper four times and then water colored with my Tombow markers.  I cut out a base layer from one of the images and then choose layers from each of the other three to layer and pop up the image of the tulips.  I had some pretty embossed pink paper that I purchased at a local art store and I inked the edges with gold.  The pink card stock was stitched to it and then lace trim, wide pink ribbon, velvet ribbon and sheer picot ribbon was added for a frilly feminine touch. 
Next I cut the base for the tulips out of my Nestabilities and added faux gold stitches on the panel and along the top edge of the ribbons. Pink pearls and glitter on the lace finish off this pretty in pink card. I really love coloring Tracey's beautiful flowers!!!  She has some great new images that I can't wait to play with, so hop on and check them out!


Here is a list of the blog hoppers in case you lose your way:

FRED SHE SAID blog http://fred-she-said.blogspot.com/

~SHELLY http://jaspere-jaspereslittlecorner.blogspot.com/

~MICHELLE http://www.inspirationblooms.blogspot.com/

~CAROL L. http://www.bycarolivy.blogspot.com/

~DARSIE B. http://www.craftingwithdarsie.blogspot.com/

~JUDY http://scrampalot.blogspot.com/  

~CAROL H. http://chocolatecraftsandbearsohmy.blogspot.com/

~LORA http://www.lorascards.blogspot.com/

~SONYA http://www.appelquilling.blogspot.com/  YOU'RE HERE!
~DEANNE http://a-scrapaddict.blogspot.com/

~FRED SHE SAID CHALLENGE BLOG http://fss-challenge.blogspot.com/

This blog hop will run from today, April 15th until April 22nd . On the 22nd, the winner will be announced on the "Fred She Said" blog http://fred-she-said.blogspot.com/  .

Thank-you for taking the time to play along. Now, to continue the blog hop, please visit DEANNE at http://a-scrapaddict.blogspot.com/  for more inspiration with Fred She Said!

When you are finished hopping, why not check out the Fred She Said Store! http://fred-she-said-store.blogspot.com/   to see more great digi images to inspire your creativity! Have fun hopping and I hope you enjoy all the goodies that the DT has created for you!!

Check back later to see more projects that I have finished!

Shalom,
Sonya
Don't forget to enter for your chance to win!

Thursday, April 1, 2010

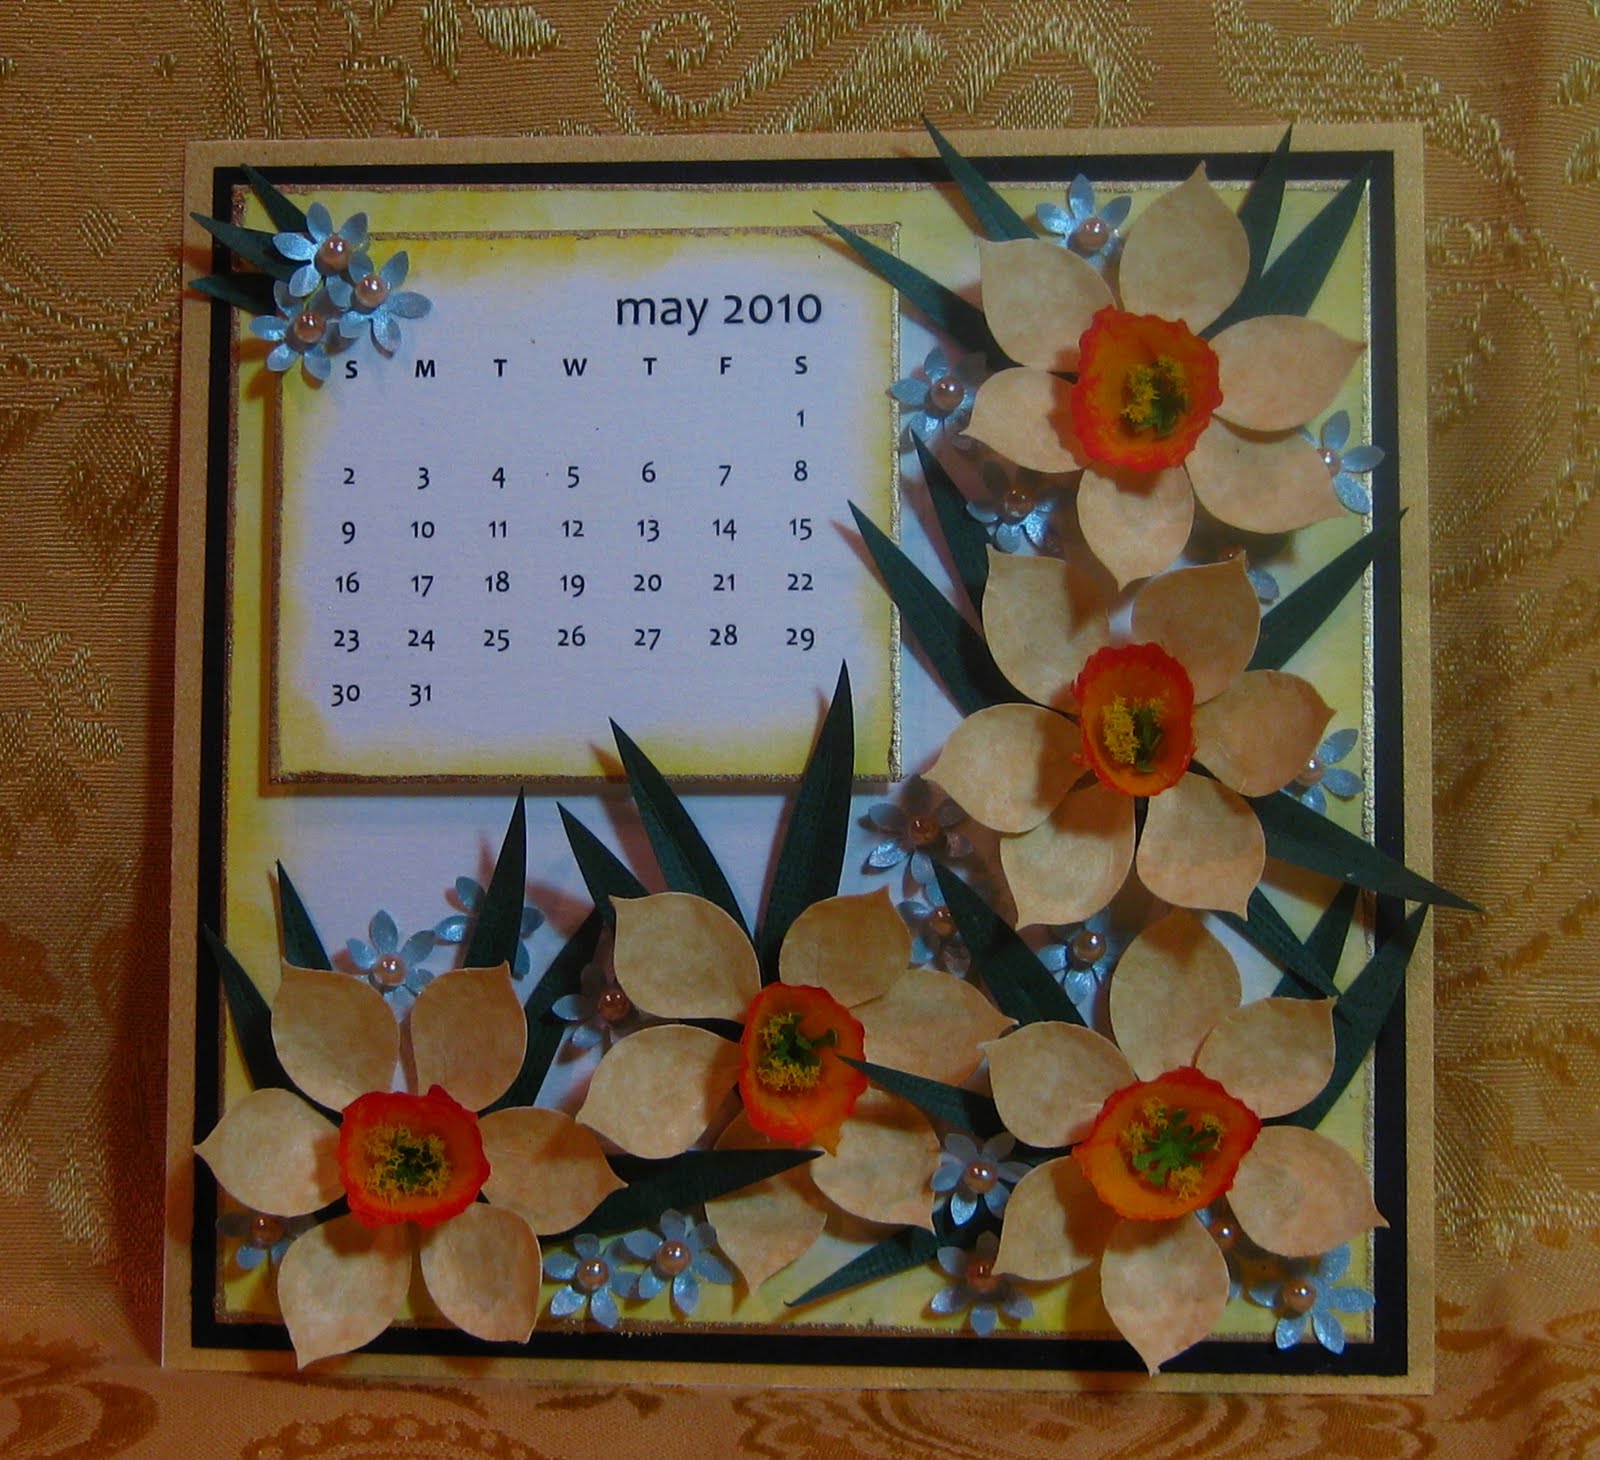
May Daffodil Calendar Page


Hi all.  Lot's of apologies today, and it's no April's Fools.  First, as you can see it has been a bit between posts.  Life has been a bit crazy and medication changes have left me down more than up.  Pain management hasn't been managing much! But that is no excuse, next, I want to apologize to all who love the Custom Quilling Newsletter that Denise works so hard on each month, and to Denise and Sue also, for not getting my projects in on time, causing it to be delayed in transmission.  It seems that I have been a day late, literally,  for the last couple of weeks and can't seem to get caught up.  So for those who were wondering where your newsletter subscription was/is, please blame me, not Denise!  Denise is so wonderful to create for and has a great online store and resource for quilling and just about any paper crafting supplies!  I sincerely regret causing it to be late as Denise is so efficient, timely and dedicated in everything that is involved with Custom Quilling and her customers, and I would not want it to reflect upon her!  I did finally get my projects to her early this morning and your newsletter should be on it's way to you!

Here is one of my projects, the May Calendar page.  The pretty yellow card stock in this months kit was perfect for these cheery floral punch daffodils.  The petals are from the soft mottled card stock and the center of the daffodils are made from water colored coffee filter paper.  Little blue accent flowers with yellow pearl centers give some contrasting softness.  Now back to getting caught up!  More projects later.

Shalom,
Sonya

Wednesday, March 17, 2010

Fred She Said Spotlight "Your A Blessing" Magic Box Tutorial


Hi all, it is my turn to make a spotlight DT project for Fred She Said and I chose to make another magic box.  Tracey our very sweet and wonderful artist leader graciously created a special Emma digi image especially for my project!!!  I love making these boxes full of surprises when they are opened and asked if Tracey could design an Emma that would hold sentiments and have a back image since the box is made to be seen 360 degrees around.  This cute Emma is holding a sign that says "Your A Blessing" but has other sentiments that you can substitute to fit the occasion.  Also in this set are the flowers, in three sizes, that are floating around her.  Click on any picture to enlarge.

You can see in the picture below the back image that fits perfectly with the front image and her dress has a perfect spot for a bow!
You can see the box closed with the lid in the above picture.  Tip, can you see the side of the box bowing out a bit?  I used a lighter weight base card stock thinking that it would be ok because of the layered panels.  Well it is just those layered panels that are weighing down that base card stock and causing that little bowing effect.  So, use a heavier base card stock, in the previous two I used Bazzil and didn't have this problem. 


I printed out the Emma with her sign and flowers (ready to print, all on one digi image sheet) onto an 8 1/2 X 11 sheet of white card stock.  I colored her with Prismacolors and OMS in blues and yellows.  Then I cut her and the flowers out with a craft knife.


After cutting out the Emma images, front and back, take a small tipped black marker (I used a small flat tipped calligraphy pen) color the white edges as in the above picture.  It gives the cut out images a finished look and can disguise any misalignment.


The flowers were also colored with Prismacolors and OMS, then the outlines gone over with a matching shade of blue metallic gel pen. I did not color the center as this is the largest and would be layered with the smallest. Turn over the flower and with a matching color marker or with Prismacolors, color the back of the flower if you wish.  Cut them out and shape on a foam matt with a ball stylus or as I did with my sewing awl.  With firm pressure, but not too heavy to tear the card stock, press down and pull a line with your shaping tool from the center to the end of the petal on each of the three design lines.  This will shape and slightly cup up your petals.  You can see this on the finished petals.


Next I take a pen that has a smooth rounded end and shape the center to cup the flower more.  You can use anything that has a similar shape to do this.  Press with firm pressure in a circular spiral motion.

I then used my glue pen to draw around the sign and edge it with yellow Martha Stewart fine glitter.  The largest and smallest flowers were layered and I added the same yellow glitter for centers and a good size dot of aquamarine Big & Glitzy Glitter Glue on the bottom center of each petal.  This gives the flowers some real sparkle and dimension.  The middle size flowers were not layered.


Using my Scor-Pal, I scored a 12 X 12 sheet of card stock at 4 1/2 and at 7 1/2, turning the card stock 90 degrees and score at the marks again.  This makes the box base. 


Cut the corner squares out to form the sides and bottom of box as above.  Then cut eight panels (4 for inside and 4 for outside of box) from either the same color card stock or one of your color choice that are 4 1/4" X 2 3/4".  Then cut from designer paper of your choice, or stamp your own, eight more panels that are 4" X 2 1/2". Using a glue pen edge with glue and glitter all 16 panels if you wish.  Layer the two glittered panels together forming eight double layer panels and glue these onto all four panels of the box base, front and back with double sided tape. I used K & Co. Handmade collection designer paper that has shiny metallic foiled designs, just perfect for this projects color scheme.
 
For the center bottom of the box, cut a  2 3/4" X 2 3/4" square of the same color card stock as the layered side panels and a  2 1/2  X  2 1/2" of the same designer paper.  Glitter these as you did the side panels but do not layer them together yet.  Set them aside.   


The top of the box is cut from a 6 1/8"  X  6 1/8"  piece of card stock and is scored at  1 1/2" and  4 1/8", turn 90 degrees and score again at the same measurements.  Following the directions for the base of the box assemble the lid and side panels on the outside of the box lid only.  The measurements for the layered side panels of the box lid are 2 7/8" X 1 1/4"; and 2 5/8" X 1" of designer paper.  

Take an acetate sheet and cut  3/8 " wide strips.  Bend over one end of the strip 1/8".  Put a glue dot or double sided tape on the back side of each layered flower and attach to the to of the bent portion of the acetate strip.  Next take the the front and back side of the Emma image and cut an acetate strip no wider than her legs and 3 1/2" long.  Add double sided tape to 2 1/2" of this strip, front and back, leaving 1" on one end with no tape.  On the front Emma image add double sided tape to the back.  The acetate strip with the double sided tape will be sandwiched between the front and back images. 

Peel backing off one side of the tape on the acetate strip and lay it down on the front Emma image from her waist to her feet.  The portion of the acetate strip with no tape will be sticking out at the bottom of her feet.  Add more double sided tape to the back of the Emma image and adhere the front to the back aligning carefully as the tape is very sticky and repositioning is not easy.  Cut the portion of the acetate strip at the bottom of the Emma image in half length wise (from her feet to end of strip) and bend one side to the front and one to the back right at her feet.  Adhere a ribbon bow to the back of Emma's dress.


Take the designer paper square that you cut for the base box center bottom and cut a slit the width of the acetate strip on the Emma image.  See picture above, but cut in the middle of the square where Emma will stand.  Slide the cut ends of the acetate strip through the slit so that Emma stands on the square (see picture).  Carefully turn over, holding in your hands, and tape the acetate ends down (with scotch tape or other non bulky tape) to the underside of the square securing it.  Emma should stand securely and free on her own. 

Now taking the acetate strips with the flowers, measure the height of the flowers standing straight up, no higher than Emma, preferably a bit shorter and varying heights, and bend the bottom end of the acetate strip at this point (where it will come out of the base).  Cut slits in the base square around Emma (as in pictures) and slide them into the base, taping them down on the underside as you did with Emma.  Add as many or as few as you like of the large double sided or medium single flowers around Emma, saving a medium and a small flower for embellishing one panel and a large double layer and two medium or small flowers for the box lid.  You could add leaves to your flowers if you wish, but I chose not to to keep to the two color theme.


You can see from the picture above the flower heights with the box partially closed. When it is closed Emma's head peeks out from among the flowers.

After adding all the flowers and making sure that they are secured with tape, take the larger glittered square piece of card stock and add double sided tape to it.  Peel of the backing and adhere the square with Emma and the flowers to it.  Peel the backing off the double sided tape on the box base center and adhere Emma to box base as in the picture of finished box.  You can adjust the "float" of the flowers by very slightly bending them at the base to get them to fall how you like.  They should float freely and bob with the slightest air movement, but should not fall flat or be standing straight up.  You could if you wish, add vellum butterflies or dragonflies to some of the strips or flowers. You may have to adjust the float as this would add weight to the flowers.
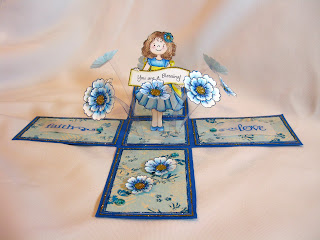

You can now embellish the insides of your panels as you wish.  In my example, I stamped in a coordinating blue ink and embossed with Kaleidoscope embossing powder, "Faith", "Hope" and "Love" onto a sheet of vellum.  Then I die cut these out with a Nestability scalloped tag die.  Blue crystals were added to the ends of the tags as well as Stickles glitter.  Two of the flowers were added to the last panel. If you wish you can add other embellishments or sentiment to the outside of the box. Let all glue dry and then fold up the four panels and put the lid on to hold closed. 

When you pull the lid off the sides will fall and the flowers will float about Emma surprising your intended recipient!  While this isn't a fast project it is well worth the time and effort and will be loved by whomever receives it and your reward will be seeing the surprise on their face!  If you have made magic boxes before, I'm sure you will love making one with Emma and the design possibilities are endless.  And a big thanks and hug to Tracey for creating this super cute Emma for me to use! You will see Emma again in another magic box later. I found the instructions for these cute boxes here, and where you will see some amazing ones as well as other tutorials! I have had fun making this box and I would love to see what you create also, link your project in the comments section! 

And if you haven't seen yesterday's post, look below to meet my newest grandaughter, Chaiya Violet.  For those who have asked, her name is Hebrew and means life. Thanks for the sweet comments to the proud Nana!

Shalom,

Sonya
Comments welcome as always!