You can see in the picture below the back image that fits perfectly with the front image and her dress has a perfect spot for a bow!
You can see the box closed with the lid in the above picture. Tip, can you see the side of the box bowing out a bit? I used a lighter weight base card stock thinking that it would be ok because of the layered panels. Well it is just those layered panels that are weighing down that base card stock and causing that little bowing effect. So, use a heavier base card stock, in the previous two I used Bazzil and didn't have this problem.
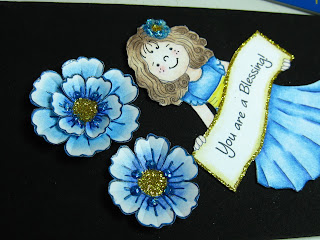
I printed out the Emma with her sign and flowers (ready to print, all on one digi image sheet) onto an 8 1/2 X 11 sheet of white card stock. I colored her with Prismacolors and OMS in blues and yellows. Then I cut her and the flowers out with a craft knife.
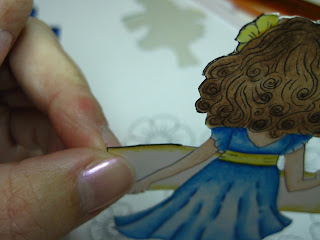
After cutting out the Emma images, front and back, take a small tipped black marker (I used a small flat tipped calligraphy pen) color the white edges as in the above picture. It gives the cut out images a finished look and can disguise any misalignment.
The flowers were also colored with Prismacolors and OMS, then the outlines gone over with a matching shade of blue metallic gel pen. I did not color the center as this is the largest and would be layered with the smallest. Turn over the flower and with a matching color marker or with Prismacolors, color the back of the flower if you wish. Cut them out and shape on a foam matt with a ball stylus or as I did with my sewing awl. With firm pressure, but not too heavy to tear the card stock, press down and pull a line with your shaping tool from the center to the end of the petal on each of the three design lines. This will shape and slightly cup up your petals. You can see this on the finished petals.
Next I take a pen that has a smooth rounded end and shape the center to cup the flower more. You can use anything that has a similar shape to do this. Press with firm pressure in a circular spiral motion.
I then used my glue pen to draw around the sign and edge it with yellow Martha Stewart fine glitter. The largest and smallest flowers were layered and I added the same yellow glitter for centers and a good size dot of aquamarine Big & Glitzy Glitter Glue on the bottom center of each petal. This gives the flowers some real sparkle and dimension. The middle size flowers were not layered.
Using my Scor-Pal, I scored a 12 X 12 sheet of card stock at 4 1/2 and at 7 1/2, turning the card stock 90 degrees and score at the marks again. This makes the box base.
Cut the corner squares out to form the sides and bottom of box as above. Then cut eight panels (4 for inside and 4 for outside of box) from either the same color card stock or one of your color choice that are 4 1/4" X 2 3/4". Then cut from designer paper of your choice, or stamp your own, eight more panels that are 4" X 2 1/2". Using a glue pen edge with glue and glitter all 16 panels if you wish. Layer the two glittered panels together forming eight double layer panels and glue these onto all four panels of the box base, front and back with double sided tape. I used K & Co. Handmade collection designer paper that has shiny metallic foiled designs, just perfect for this projects color scheme.
For the center bottom of the box, cut a 2 3/4" X 2 3/4" square of the same color card stock as the layered side panels and a 2 1/2 X 2 1/2" of the same designer paper. Glitter these as you did the side panels but do not layer them together yet. Set them aside.
The top of the box is cut from a 6 1/8" X 6 1/8" piece of card stock and is scored at 1 1/2" and 4 1/8", turn 90 degrees and score again at the same measurements. Following the directions for the base of the box assemble the lid and side panels on the outside of the box lid only. The measurements for the layered side panels of the box lid are 2 7/8" X 1 1/4"; and 2 5/8" X 1" of designer paper.
Take an acetate sheet and cut 3/8 " wide strips. Bend over one end of the strip 1/8". Put a glue dot or double sided tape on the back side of each layered flower and attach to the to of the bent portion of the acetate strip. Next take the the front and back side of the Emma image and cut an acetate strip no wider than her legs and 3 1/2" long. Add double sided tape to 2 1/2" of this strip, front and back, leaving 1" on one end with no tape. On the front Emma image add double sided tape to the back. The acetate strip with the double sided tape will be sandwiched between the front and back images.
Peel backing off one side of the tape on the acetate strip and lay it down on the front Emma image from her waist to her feet. The portion of the acetate strip with no tape will be sticking out at the bottom of her feet. Add more double sided tape to the back of the Emma image and adhere the front to the back aligning carefully as the tape is very sticky and repositioning is not easy. Cut the portion of the acetate strip at the bottom of the Emma image in half length wise (from her feet to end of strip) and bend one side to the front and one to the back right at her feet. Adhere a ribbon bow to the back of Emma's dress.
Take the designer paper square that you cut for the base box center bottom and cut a slit the width of the acetate strip on the Emma image. See picture above, but cut in the middle of the square where Emma will stand. Slide the cut ends of the acetate strip through the slit so that Emma stands on the square (see picture). Carefully turn over, holding in your hands, and tape the acetate ends down (with scotch tape or other non bulky tape) to the underside of the square securing it. Emma should stand securely and free on her own.
Now taking the acetate strips with the flowers, measure the height of the flowers standing straight up, no higher than Emma, preferably a bit shorter and varying heights, and bend the bottom end of the acetate strip at this point (where it will come out of the base). Cut slits in the base square around Emma (as in pictures) and slide them into the base, taping them down on the underside as you did with Emma. Add as many or as few as you like of the large double sided or medium single flowers around Emma, saving a medium and a small flower for embellishing one panel and a large double layer and two medium or small flowers for the box lid. You could add leaves to your flowers if you wish, but I chose not to to keep to the two color theme.
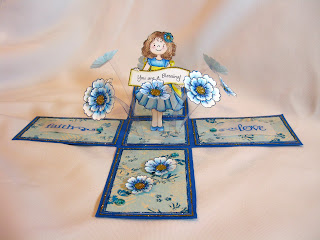
You can see from the picture above the flower heights with the box partially closed. When it is closed Emma's head peeks out from among the flowers.
After adding all the flowers and making sure that they are secured with tape, take the larger glittered square piece of card stock and add double sided tape to it. Peel of the backing and adhere the square with Emma and the flowers to it. Peel the backing off the double sided tape on the box base center and adhere Emma to box base as in the picture of finished box. You can adjust the "float" of the flowers by very slightly bending them at the base to get them to fall how you like. They should float freely and bob with the slightest air movement, but should not fall flat or be standing straight up. You could if you wish, add vellum butterflies or dragonflies to some of the strips or flowers. You may have to adjust the float as this would add weight to the flowers.
You can now embellish the insides of your panels as you wish. In my example, I stamped in a coordinating blue ink and embossed with Kaleidoscope embossing powder, "Faith", "Hope" and "Love" onto a sheet of vellum. Then I die cut these out with a Nestability scalloped tag die. Blue crystals were added to the ends of the tags as well as Stickles glitter. Two of the flowers were added to the last panel. If you wish you can add other embellishments or sentiment to the outside of the box. Let all glue dry and then fold up the four panels and put the lid on to hold closed.
When you pull the lid off the sides will fall and the flowers will float about Emma surprising your intended recipient! While this isn't a fast project it is well worth the time and effort and will be loved by whomever receives it and your reward will be seeing the surprise on their face! If you have made magic boxes before, I'm sure you will love making one with Emma and the design possibilities are endless. And a big thanks and hug to Tracey for creating this super cute Emma for me to use! You will see Emma again in another magic box later. I found the instructions for these cute boxes here, and where you will see some amazing ones as well as other tutorials! I have had fun making this box and I would love to see what you create also, link your project in the comments section!
And if you haven't seen yesterday's post, look below to meet my newest grandaughter, Chaiya Violet. For those who have asked, her name is Hebrew and means life. Thanks for the sweet comments to the proud Nana!
Shalom,
Sonya
Comments welcome as always!


The box is absolutely beautiful! the little girl image is very pretty. thank you for the tutorial.
ReplyDeleteThis box (and all the others I have seen) is absolutely gorgeous! I may just have to make one of these for my daughter's BD in November! ;-)
ReplyDeleteHugs
Carol
Test comment, to see if they will show up!!!
ReplyDeleteHow cute and fun!
ReplyDeleteThe box is too good.the flowers on top are brilliant.
ReplyDeleteThis box is absolutely beautiful
ReplyDeleteand many thanks for your tutorial.
Marta (Italy)
piccolomondocreativo.blogspot.com
good idea...very creative....absolutely beautiful....
ReplyDeletehugs:susan
www.susanquilling.blogspot.com
absolutely gorgeous Sonya!!!
ReplyDeleteand a big CONGRATULATIONS on your granddaughter!!!
blessings, Maria