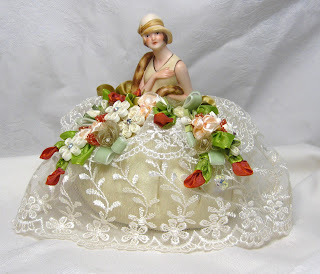
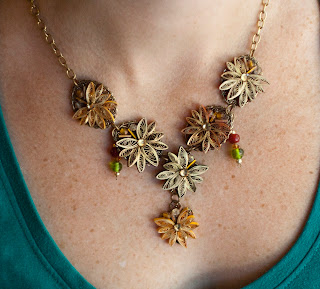
Hi all!! Back again with another project, this one that has a little bit of everything in it - quilling, ribbonry, sewing, beading, porcelain doll! I have had this ready but not photographed because are whole family has been down with what I call the "creeping crud". One of those bad head colds that zap the life out of you. I have been counting the days now for a week to look forward to feeling better, but that hasn't happened yet! Last weekend my DH took me to the International Quilt Show here in Houston and sweetly walked around while I looked at the vendors and the quilt displays, never huffing, never looking at his watch. He's a keeper! One of my favorite booths is the Helen Gibbs Ribbonry booth. She had the most beautiful projects for ribbon, stunning flowers that can be made into all sorts of feminine frillery! I think I have almost all of her books and while I have made some of the projects I just love to look at the pictures!!
I have in the past tried my hand a porcelain doll making and have created porcelain dolls from greenware to dressed and have loved the whole process. The studio that I was taking classes from closed and I never found another to continue, so my supplies were put away for another time. While at Helen's booth, she had for sale a kits to make vintage porcelain half doll pincushions. These vintage beauties were all the rage back in the day and women decorated the "skirt" pincushion portion of their bodies with silks, lace, ribbon flowers and beading. They were used to create tassels, tops to powder puffs and to hide anything on the dresser that was "unmentionable" in polite society. There are lots of picture on the net of them and I love to look at them for inspiration.
Front view
My mind immediately went to "I can add quilled flowers in the mix and it would be stunning!" After I assembled the bottom pincushion from the dupioni silk and attached the flapper doll half body. Then I added her two layer lace over skirt and started to embellish it with an assortment of ribbon flowers and beading. The kit came with a few flowers but the majority of these were made just for her.
Right front side
I quilled white six petal flowers with aurora crystal centers, buds and leaves to add amongst the ribbon and lace. The quilled flowers were held in place by the same thread that I used for attaching the ribbon flowers. I just set them in the design and came up with my threaded needle close to the center of the quilled flower and then down through the adjoining petal. If you look close with the picture enlarged you will be able to see the thread, but not when viewing it from a normal range. The buds were glued in as they were a bit tricky to get them to sit the way I wanted them to. I have used fabric glue before to glue the quilled flowers on the Ring Bearer Pillow with success.
Left front side
There are many antique half dolls for sale on ebay and other places on the net, but Helen has a source that recreates them for her. The reproductions come in a wide rage of ladies, dressed in all sorts of historical costumes to ones that are more modern in dress, as well as a wide range of poses, colors.
Back view
I would love to try my hand at porcelain painting again and have found another studio that pours the doll bodies! Unfortunately the studio is about 45 minutes away and I don't know how often that I will get to go for classes, but, I can get the blanks done and fired to paint and fire the painting with my own kiln. It takes several firings to get the greenware to a point where you can paint the features and each layer of painting takes another. This doll body is beautifully done by the artist that created her. This lady has become an heirloom for one of the grand daughters, but since I have two DGD's I will need another and I have a design in my head for another with all quilled embellishments!
My online quilling class Quilling, Twirled Paper! is being offered again by My Creative Classroom. It is six weeks starting November 26, 2012 with a two week break for the holidays, starting again Jan 7, 2013 with the final two lessons. The class covers beginning quilling and moves onto intermediate quilling techniques. There are projects each week to create to show off your quilling skills, a forum to chat with me and your fellow students and a gallery to post your projects if you like! You can view the lessons at your leisure when ever you like and with the MCC Extended Enrollment you will have access to all the class materials even after the classroom closes. And, if you enroll for any class in November you will get the "It's Ornamental" class free! To see the class description, supply list and optional kit, click on the banner above or here.
Thanks for visiting and all the sweet encouragement that you leave in the comments. Feel free to email me if you have any questions!
Shalom,
Sonya


